I created the following tutorial for www.acherryontop.com. You can find all of the supplies I used in the ACOT shop!
We have a favorite cupcake shop in town, that has such cute little take-out boxes. I am a sucker for containers and packaging, and as I was disasembling the box to put it in the recycling bin, I started to think dangerous crafty thoughts! I thought that surely I could use this box as a template to create my own little box. It was a great size box because when it was opened up, it fit on a 12x12 sheet of paper. Today I'd like to show you what I created, as well as share some inspiration and resources so that you can become a box-making master!
In addition to basic tools, here are the supplies I used today:
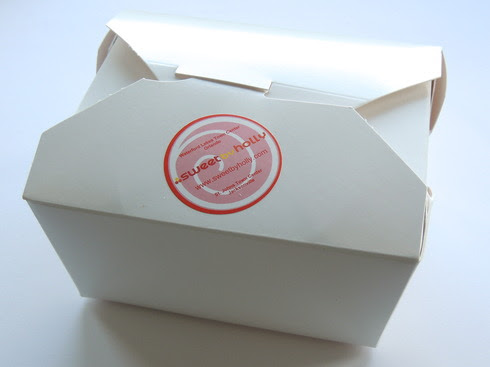
This is the box that inspired my project. It's basically like an elongated "chinese take-out box".
My first step was to carefully disasemble the box and trace it onto paper. Then I cut the outer shape. Using the original box as a guide, I then began to fold and score the necessary lines. I used my Scor-Pal to help me achieve clean edges.
Think about the paper you'll use. I chose My Mind's Eye patterned paper, which is a cardstock weight paper, but depending on what you plan to fill your box with, you may want to use thicker weight cardstock, like 100#, for heavier treats. (Bazzill Card Shoppe is a great heavy thickness, if your template fits on 8.5x11)

After trimming and scoring the box shape, I used the original as a guide for gluing any edges that needed to be secured. (I apologize for the lack of pictures of this step -sometimes I just don't have enough hands to fold, hold, secure, and photograph all at once!)
To embellish my box, I kept it pretty simple. I used stickers from SRM Stickers - this is my favorite sticker company! They make fabulous stickers that are so versatile and easy to use. I especially love their collections for parties, weddings and graduations. I used a cheery cupcake sticker and adhered it to a diecut kraft circle. I punched a hole in it, and tied it around my box with baker's twine from The Twinery. Quick and simple, but perfect for birthday goodies!

To finish off my project, I created a matching card. I used another sticker, and another diecut circle, and then assembled my card with layers of patterned paper, cardstock, plus a sentiment and scalloped border stickers, also from SRM.

I can totally see this box going in to my child's teacher, filled with treats - or even a small gift. It would be great for a coworker or neighbor too!

Now, although I was completely inspired by my garbage (giggle giggle) there are other ways to create quick and easy gift boxes even if you don't have a take-out box to disassemble. Thanks to the internet, if you Google the words "free printable box templates" you will find more resources than you can imagine. Trust me - you will be totally inspired. All you have to do is print the template on cardstock, trim, and score - or print it on paper, trim it, and use THAT as a template. For even more ideas, check out a lot of inspirational projects in Score, Fold, Create! by Annie's Attic.
Thanks for stopping by today to see my new take on recycling! I hope you're inspired to look differently the next time you see some unique packaging, and that you'll think twice about your trash - I mean treasures!
3 comments:
Your card and box turned out really cute!!
Great tutorial, the photos are excellent and the box is adorable. So clever and crafty!
Post a Comment