
Hey friend! You usually stop by my blog to see handmade card ideas, but today I have an oh-so-sweet angel Christmas ornament craft that you can make with your card making supplies. The best part? You probably already have everything you need, and there are lots of ways to add your own special twist. Plus, this project is so simple it's a great one for kids to help with - or create on their own.
This blog post contains affiliate links. When you shop through my links I receive compensation at no cost to you. Thank you from the bottom of my crafty heart.

There are three important details about today's Christmas ornament craft:
1.) It's simple and fun for both kids and adults to create (even the ones who say they aren't crafty!)
2.) It uses inexpensive supplies that you probably have on hand.
3.) The parts are easy to mass-produce, if you want to create it with a group.
I created this ornament for a family Christmas event hosted by our church, so I prepped 100 of each piece and the kids assembled the angel ornament to take home with them. These sweet paper angels would also make great tags to add to wrapped gifts, or as a simple handmade gift to share with a loved one.

 You'll love creating this simple craft on your own, with a group of friends, or with your favorite kids. The steps are simple and angel ornament turns out so cute no matter what combination of colors, circles, and embellishments.


links updated 8/22/24
Supplies:
All you'll need to create this handmade angel ornament is:
- cardstock (with optional sparkle or metallic cardstock, or vellum)
- nesting circle dies + a die cutting machine
- glue stick or liquid glue, plus a little scotch tape (I love the Bearly Art Precision Glue)
- thread or twine
- To accent your angel, you'll want small star or heart dies, stickers, or any type of simple pre-made embellishment you have on hand.
Prep the Pieces:
Whether you want to make one angel ornament, or 100 angel ornaments I suggest die cutting all the pieces first. Look through your stash of circle dies. You'll need a large circle die (for the body and wings) plus two smaller circles that are fairly close in size (for the head and halo.) My large circle is 4.25-inches across, and my two small ones are about 1.25-inches and 1.75 inches. Don't get too stuck on the measurements though - just eyeball it and see what looks good to you. I did a bit of experimenting with the dies I have.
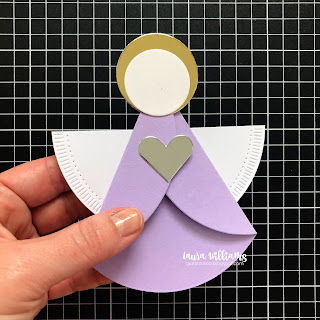
- For each angel you'll cut one large circle for the body. (This is the lavender circle on today's project.) Choose a color you like, or use white for a traditional all white angel.
- Then, cut a second circle in the same size from white, for the wings. You'll fold this in half, or cut it in half if you plan to create multiple angels. If you'd like, use a circle die that has some pattern or design to it. I used the Fluted Classics dies from Spellbinders to add some design to my wings.
- Next, cut the two smaller circles for the head and halo. Cut the larger of the two from metallic or sparkle cardstock if you have it. Otherwise a shade of yellow would also be lovely. The face can be cut from kraft or white cardstock.
- Lastly, if you'll be die-cutting a heart or star for the center of the angel, do that now. If you're making multiple angels, feel free to mix and match with colors and shapes.
Assemble the Ornaments:
- First, fold one side of the large circle (less than half way) and fold the other side to create a triangle point. There's no special measurement or way to do this. It has worked for me every single time. If it doesn't make a perfect point, don't worry. It'll be covered up anyway.
- Add a tiny bit of glue to the folds to keep them down.
- Glue the two small circles as shown. The smaller circle should be attached at the bottom of the larger one.
- Glue the circles at the top point of the angel body.
- Glue the half circle to the BACK of the angel as the wings. Add a die cut shape or embellishment to the middle. You can also add an optional twine or thread bow at the angel's neck. I attached it with a glue dot.


- The last step is to simply add a piece of thread or twine as a hanger. I simply taped both ends of a short length of twine to the back of the angel's head. This project is so lightweight, it doesn't need anything stronger than that.
- Use smaller circle dies to make a smaller angel. (Maybe a family of angels!)
- Use scalloped dies, or dies with fancy edges or embossing. (Use them on the wings, the body, or both.)
- Use vellum for any or all of the pieces, for a dainty and elegant angel.
- Use patterned paper for the body.
- Add the angel to the front of a handmade card!
- Sign your name and add the date to the back of this project for a special keepsake.
Shop Supplies for This Craft:
I love using the Magic Mat for this project, because it alleviates those pesky cutting lines on the underneath side of die cut shapes. You know, the ones from your best used cutting plates?
Shop all the Magic Mat sizes here
I'm so glad you stopped by today. Let's connect again - subscribe so you don't miss a blog post! Plus, follow me on Pinterest where I'm sharing crafty projects every day!
1 comment:
Adorable. Will use this idea for a craft at my annual Christmas tea. Thank you for the idea and instructions. Natalie
Post a Comment