Showing posts with label projects. Show all posts

Wednesday, December 8, 2021

How to Make a Simple and Elegant Paper Angel Ornament With Die Cut Circles

 Hey friend! You usually stop by my blog to see handmade card ideas, but today I have an oh-so-sweet angel Christmas ornament craft that you can make with your card making supplies. The best part? You probably already have everything you need, and there are lots of ways to add your own special twist. Plus, this project is so simple it's a great one for kids to help with - or create on their own. 

This blog post contains affiliate links. When you shop through my links I receive compensation at no cost to you. Thank you from the bottom of my crafty heart.

Learn to make this simple handmade angel Christmas ornament using cardstock, twine, and die cutting supplies. Cut all the pieces ahead of time and assemble with friends or kids for a fun holiday activity. Or create them yourself, and add your own twist to each design, and give them as holiday gifts. These cardstock angels use only simple supplies, and they are easy to adapt based upon your favorite colors, and craft supplies on hand. I'd love to show you how to make this fun festive Christmas ornament!

There are three important details about today's Christmas ornament craft:

1.) It's simple and fun for both kids and adults to create (even the ones who say they aren't crafty!)
2.) It uses inexpensive supplies that you probably have on hand.
3.) The parts are easy to mass-produce, if you want to create it with a group. 

I created this ornament for a family Christmas event hosted by our church, so I prepped 100 of each piece and the kids assembled the angel ornament to take home with them. These sweet paper angels would also make great tags to add to wrapped gifts, or as a simple handmade gift to share with a loved one. 

Supplies:

All you'll need to create this handmade angel ornament is: 
  • cardstock (with optional sparkle or metallic cardstock, or vellum)
  • nesting circle dies + a die cutting machine
  • glue stick or liquid glue, plus a little scotch tape (I love the Bearly Art Precision Glue)
  • thread or twine
  • To accent your angel, you'll want small star or heart dies, stickers, or any type of simple pre-made embellishment you have on hand. 

Prep the Pieces:

Whether you want to make one angel ornament, or 100 angel ornaments I suggest die cutting all the pieces first. Look through your stash of circle dies. You'll need a large circle die (for the body and wings) plus two smaller circles that are fairly close in size (for the head and halo.) My large circle is 4.25-inches across, and my two small ones are about 1.25-inches and 1.75 inches. Don't get too stuck on the measurements though - just eyeball it and see what looks good to you. I did a bit of experimenting with the dies I have. 

  • For each angel you'll cut one large circle for the body. (This is the lavender circle on today's project.) Choose a color you like, or use white for a traditional all white angel. 
  • Then, cut a second circle in the same size from white, for the wings. You'll fold this in half, or cut it in half if you plan to create multiple angels. If you'd like, use a circle die that has some pattern or design to it. I used the Fluted Classics dies from Spellbinders to add some design to my wings.
  • Next, cut the two smaller circles for the head and halo. Cut the larger of the two from metallic or sparkle cardstock if you have it. Otherwise a shade of yellow would also be lovely. The face can be cut from kraft or white cardstock.
  • Lastly, if you'll be die-cutting a heart or star for the center of the angel, do that now. If you're making multiple angels, feel free to mix and match with colors and shapes.
You'll only need a few simple die cut shapes to create this sweet elegant handmade angel ornament for Christmas. Make them yourself, or gather some friends or family to do a Christmas craft together. This ornament is so simple that even kids can create it, but it looks elegant enough that adults will love it too! Stop by for all the simple instructions, tips, and ideas to put your own style and twist into the design!

Assemble the Ornaments:

  • First, fold one side of the large circle (less than half way) and fold the other side to create a triangle point. There's no special measurement or way to do this. It has worked for me every single time. If it doesn't make a perfect point, don't worry. It'll be covered up anyway.
  • Add a tiny bit of glue to the folds to keep them down. 
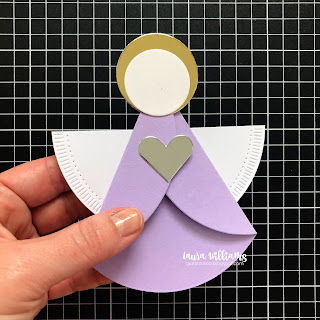
    Step one of the handmade angel ornament craft - die cut a large circle, and fold it in to create a point. This will be the angel's body. Add a dot of glue to hold down the folds.

  • Glue the two small circles as shown. The smaller circle should be attached at the bottom of the larger one.
  • Glue the circles at the top point of the angel body.
    This is the second step to assemble the simple paper angel ornament craft. Layer two die cut circles onto each other as shown, to create the head and halo. Then glue it onto the folded point of the body.
  • Glue the half circle to the BACK of the angel as the wings. Add a die cut shape or embellishment to the middle. You can also add an optional twine or thread bow at the angel's neck. I attached it with a glue dot.
The third step of the simple angel ornament craft is to add the half circle wings onto the back of the angel's body. If you're making one angel, you can simply fold the circle in half and adhere. Or, cut it in half on your paper trimmer, and get two sets of wings from each circle! This simple craft is fun for a group to do together at Christmas time. It's kid friendly too!
  • The last step is to simply add a piece of thread or twine as a hanger. I simply taped both ends of a short length of twine to the back of the angel's head. This project is so lightweight, it doesn't need anything stronger than that. 
If you love making these handmade angel ornaments, then think about how you can change it up and add your own special details, like:
  • Use smaller circle dies to make a smaller angel. (Maybe a family of angels!)
  • Use scalloped dies, or dies with fancy edges or embossing. (Use them on the wings, the body, or both.) 
  • Use vellum for any or all of the pieces, for a dainty and elegant angel. 
  • Use patterned paper for the body. 
  • Add the angel to the front of a handmade card!
  • Sign your name and add the date to the back of this project for a special keepsake.
You'll love finding ways to customize this simple angel ornament craft with your own special twist. The project starts with just simple die cut circles. But you can fancy it up using scalloped or other edged circle dies, and adding twine, sparkle cardstock, and special die cut elements to make it all your own. You'll have fun creating this craft on your own, or as a group. It makes an awesome craft for Sunday school classes, a group of friends, or family get-togethers. Stop by for all the instructions, tips, and ideas for this angel ornament craft!

You'll love creating this simple craft on your own, with a group of friends, or with your favorite kids. The steps are simple and angel ornament turns out so cute no matter what combination of colors, circles, and embellishments.
Are you looking for a simple Christmas ornament craft for kids or adults to make? This sweet angel ornament only needs cardstock, simple die cut circles, and twine. It's simple enough for even kids to make, but it looks so sweet, that kids AND adults will love to create it, and hang it on their tree. Stop by for all the instructions and tips for this simple Christmas craft. It's perfect for Sunday school classes, Girl Scout troops, or Christmas parties.

Shop Supplies for This Craft:
I love using the Magic Mat for this project, because it alleviates those pesky cutting lines on the underneath side of die cut shapes. You know, the ones from your best used cutting plates? 

This beautiful angel ornament craft uses just cardstock, die cut circles, and twine. Kids and adults will love creating this beautiful handmade ornament with simple supplies and simple assembly. It's a fun group activity and it makes a sweet little gift or tag. Would you like all the instructions and tips? Visit my blog for all the details on this festive - and simple - holiday craft.

I'm so glad you stopped by today. Let's connect again - subscribe so you don't miss a blog post! Plus, follow me on Pinterest where I'm sharing crafty projects every day!

If you're looking for a simple handmade Christmas ornament craft, that uses hardly any supplies - but looks BEAUTIFUL, then you've come to the right place. I'd love to share this simple and sweet handmade angel ornament with you. You'll just need your die cutting machine, with a few sizes of circle dies, plus cardstock and twine. This project is so simple that kids and adults can all create it and have a great time making festive Christmas ornaments. It's perfect for a craft night, a Sunday school class, or a group activity for any age group.

links updated 8/22/24

Wednesday, June 17, 2020

Share Handmade Surprises in Adorable Treat Boxes

Hey there, my crafty friends! Today's post is for you - as well as your less crafty friends and family. This just might be your opportunity to bring your less-than-crafty people into the mix and work on a project together - plus, it will seriously brighten someone's day. Are you intrigued? Let's take a look!

This blog post contains affiliate links. When you shop through my links I receive compensation at no cost to you. Thank you from the bottom of my crafty heart!
What is this fabulous collection of crafty goodness, you may be asking? It's the Hello Delivered Bundle from FSJ. This bundle, along with the similar Love Delivered Bundle, was put together to help you find a fun and simple way to share some handmade love with those around you. This bundle contains food-safe boxes to fill with homemade or store-bought treats, little gifties, trail mix, or candy. 

Grab some goodies to pack up, and then use the pre-printed tags, ribbon, clips, and buttons to accessorize your boxes. Then, leave them on doorsteps, desks, mailboxes, or anywhere you have people who could use some kindness and a little surprise. And because there's no fancy stamping, or even diecutting required, it's a great project to pull in your kids, grandkids, friends or family to help assemble and decorate. 

Today I have a few quick examples - and since I'm in the crafty mama category, I pulled in some of my other supplies to add a little extra fun. The preprinted cards in the bundle are fantastic because there are so many ways to use them. Cut them with scissors, die-cut them, or use a paper trimmer and then attach them not just to boxes, but use them on handmade cards too! (You can find an array of these fun tag sets sold separately on the Spellbinders website too... they're even on sale right now!) 
 For my projects, I added in the Birthday Bash embossing folder onto the background of my card.I also added in the Spring Treat Bags. Those bags are adorable, practical, and CHEAP. Like, seriously such a good deal for a pack of ten bags. And the coordinate so perfectly with these bundles, I couldn't resist adding them into the mix.
Over on the Spellbinders blog, I compiled some great ideas for filling and sharing the boxes you make with the Hello Delivered and Love Delivered Bundles. Would you like a peek at some of the ideas?

FILL THE BOXES WITH:

  • Homemade cookies or sweet treats
  • Store bought pre-packaged snacks
  • Trail Mix
  • Caramel Corn
  • S’mores kit
  • Mini candy bars
  • Nail polish, lip gloss and lotions (travel sizes of cosmetics will fit perfectly too!)
  • Gift cards and small gifts
  • A set of mini handmade cards
  • Craft supplies for a crafty friend

WAYS TO SHARE THEM:

  • Create birthday or graduation party favors for a drive-by celebration or gathering.
  • Make homemade treats or goodies and leave them on your co-workers’ desks.
  • Drop off gifts, gift cards or goodies to say thank you to first responders.
  • Leave surprise gifts on your neighbor’s doorsteps.
  • Box up a care package and mail it to someone far from home or alone right now.
  • What about your favorite delivery people, and postal workers? Can you imagine their surprise when you hand them something as they make a delivery to your house?
  • Box up to-go treats to take home after a BBQ or picnic.
  • Pack up popcorn or snacks in these grab-and-go boxes for an outdoor movie night.
  • Let your kids make up s’mores kits with all the ingredients to deliver to their friends.
  • Send a surprise to your grandkids, nieces, nephews or young family friends. Crayons, playing cards, and small trinkets will fit in these cute boxes and they’ll LOVE getting happy mail or a front-porch delivery.
There's more inspiration and information on the Spellbinders blog, and you'll find all the contents of the bundles on the website. Shop here for the Hello Delivered and Love Delivered Bundles! Thanks so much for stopping by today!

Supplies on Today's Projects:
Hello Delivered Bundle
Birthday Bash Embossing Folder
Spring Treat Bags

Oh and HEY, don't forget the Summer Super Sale is going on now at Spellbinders too! Find all kinds of items up to 50% off!  (through June 21, 2020)

Friday, March 20, 2020

Try This! How to Make an Exploding Envelope with a Scoring Board

Hello dear friends, I have a REALLY fun cardmaking project to share with you today. It begins with a simple handmade envelope using a scoring board. But this envelope will contain an unexpected surprise. (No, it's not filled with cash OR a glitter bomb.) Let's take a look and I'll show you all the tips, tricks, and the secret inside! 

This blog post contains affiliate links. When you shop through my links I may receive compensation at no cost to you. Thank you from the bottom of my crafty heart!

Getting Started - How To Make An Envelope

Have you ever made your own envelopes using a scoring board? I'm a big fan of my FSJ Scoring Board but you can use any brand of scoring board you have. Each one is a little different, but if you need a refresher/want to learn more about the FSJ Journey Scoring Board, click here for my simple tutorial.

To begin this project, make an envelope in any size you'd like. (TIP: Don't have a scoring board? Gently disassemble any envelope you have and use it as a stencil to make your own from scratch!) This one is a standard envelope for a 4.25x5.5" card. It's fun to play with different sizes though! Once you score and fold your envelope - don't seal it up. Why? Because it's time to add the surprise inside....

Let's Look Inside 

The envelope IS the card on this fun handmade project and there are so many surfaces to create with. Does this feel overwhelming? Let's think about it - the main rectangle of your envelope is the same size as a card. So tackle the layout as if you're creating a card. As you're creating, think about the flaps and how to incorporate them into your design. Your exploding envelope can be packed with embellishments, die cut shapes, stamped images, pockets and more - or you can keep it pretty clean and simple.

I love to add mini envelopes and pockets to add a gift card, notes or even photos. These exploding envelopes are really fun to theme for birthdays and graduation too. After you're done decorating the inside of the envelope, fold it up and then decide how to handle the front. I like to wrap a strip of patterned paper around it like a belly band or maybe some fabulous ribbon with a big bow. For this card, I added a great big die cut flower too. The recipient can just slide the band off and open the envelope.
Would you like some more inspiration? This is an Easter Exploding Envelope that I created for FSJ + Spellbinders. Don't miss the video tutorial below, where Kim Kesti demonstrates how to create it, just in time for Easter!
Make an exploding envelope handmade card for Easter. Watch the crafting tutorial, or read all about it to get started on your own fun craft for springtime using die cutting and rubber stamping. Visit my blog to see another springtime floral exploding envelope too! All you need to get started is a scoring board, and little bits of this and that. Add pockets, notes, and fun embellishments to make this creation all your own!
Here's what the envelope looks like when it's closed up. I love the big pinwheel on the front of it! Just make a paper belly band to wrap around it, and then embellish with a puffy bow, paper flower or pinwheel!
Make an Easter Exploding Envelope Card using stamps and dies from Spellbinders. Visit my blog to see more exploding envelope crafts, plus a video tutorial to create this sweet Easter craft project.

Don't miss this video from Spellbinders where Kim Kesti walks you through this project!


Get the Goods!

Looking for dies and supplies to make an exploding envelope? Check out my supply list for the goodies I used - some of them are even on clearance so it's a great time to grab them.  Thanks SO very much for coming by today. If you try out this fun handmade craft, I hope you'll share a link with me in the comments. They are such fun! xoxo

Exploding Envelope Supplies:

Thanks for stopping by today! Was this your first time here? Let's connect againFollow me on Facebook, Instagram, and Pinterest where I'm sharing crafty goodness all week long. xoxo


You Might Also Like These Posts:
click the link below each image


Wednesday, September 11, 2019

Want to Know Two of My Favorites for Christmas Cards?

Hello crafty friends! I feel like this time of year my blog posts hop from season to season - one day I'm celebrating Halloween, the next day Christmas, and then back to Thanksgiving. Throw in some summer projects here and there (since it's still 95 degrees outside) and color me CONFUSED.  

Tis' the season though, right? 

I noticed that Costco is already rocking the Halloween AND Christmas decorations, right next to back-to-school clothes - so it's probably their fault that my blog is a mess. That's where I'll place the blame anyway. But I digress . . .today is Christmas around here so let's get merry and check out today's project: 
(This post contains affiliate links. If you shop through my links, I'll receive compensation at no cost to you. Thank you from the bottom of my crafty Christmas heart!)

I got crafty with two of my FAVORITES for Christmas projects. First, this poinsettia stamp set is one of my VERY favorites and it was high time to pull it out and get crafty. Is there anything more classic than poinsettias for Christmas? This is one of those stamp sets that I NEVER get tired of - and I'm pretty fickle about stamp sets, so that says a lot. The images are large and they fit together so well to make gorgeous Christmas floral arrangements on cards and crafts. Today I made a card, plus a coordinating treat box.
The box was made with the Gable Favor Box Die from FSJ. It's just one piece that you diecut twice and assemble. It honestly comes together really easily with some white liner tape, all ready to embellish and fill with goodies.

It's the perfect size for candy and a gift card, or jewelry, small party favors, or a couple of Christmas cookies. Think: teacher gifts, co-worker gifts, party favors, etc. And really, don't we need those things all year long?
Next up, a pretty simple card. I stuck with the same arrangement of poinsettia and leaves because I loved the way it turned out. After stamping and trimming these images (there's actually coordinating dies that I don't seem to have - which would make this project even easier, although I kind of like fussy cutting!)

I added my favorite steel rule tag die and used the same absolutely FABULOUS Cozy Prints patterned paper for both of these projects - and that my friends, is my SECOND FAVORITE for Christmas crafts - give me alll the buffalo check print! Stencils, patterned paper, fabric - LOVE it. It's cozy but bold and it just feels comfy and warm.

 To finish off this poinsettia I added some rhinestones and Fashion Silver dots to the center. Kind of a fun sparkly detail, right?

The BONUS of these projects is that much of what I used is ON SALE right now. Spellbinders + FSJ is having a great sale to help you get rocking and rolling on holiday crafts. Up to 40% off some of our favorite tried and true stamps and dies for Christmas, New Year, and more. You'll find the products I used linked below.

Thanks so much for coming by today! If you're making plans for holiday cardmaking and crafting, I'd love to see what you create. Be sure to stop by the Spellbinders + FSJ website to see the entire holiday sale!

Supplies: Poinsettia Burst Stamp Set | *Poinsettia Burst Die Set | Gable Favor Box Die | Tag Set Steel Rule Die | Cozy Prints 12x12 Patterned Paper | Cut Rhinestones | Christmas Inside and Out Stamp Set (Season's Greetings stamp) | Whimsy Trees Stamp Set (Spread Christmas Cheer stamp) | Fashion Silver | Natural Journey Thread | Cranberry Bliss ink pad | Rich Coral ink pad | Fresh Forest ink pad


Monday, September 9, 2019

How To Make Ghostly Pencil Toppers for Halloween

Looking for Halloween treats to share that aren't filled with sugar and don't cost much to make? (Plus bonus points for being SUPER SIMPLE?) 

Today's project took only a few minutes, and the sweet simplicity of it makes it fun and easy to make as many as you'd like. Let's take a look at these ghostly pencil toppers that you can make for trick-or-treaters, co-workers, your favorite teacher or student, or. . . let's face it, you might want to make them for yourself! 

(This post contains affiliate links. When you shop through my links, I'll receive compensation at no cost to you - thank you from the bottom of my crafty heart!) 
The Ghost Die from Impression Obsession makes this project a BREEZE. Simply die-cut the ghosts from white cardstock and then attach them to Halloween pencils. (A foam square, Glue Dot, or even a tiny dab of hot glue should each hold the ghost in place quite well.) I finished off the ghosts with those CUTIE PIE pre-made tiny bows from FSJ. They make perfect bowties and hair bows for my little ghosty friends.

I like to stock up on pencils when they're on sale after the holidays. (Walmart or Target has cute seasonal pencils on clearance throughout the year.)

To finish this project, grab a Mason jar (do you hoard Mason jars the way I do?) Wrap a band of patterned paper around it. Then simply embellish it. I die cut the BOO die (it includes that adorable spider too!) and adhered the letters to the band. I finished off the band with a black ribbon bow, and called it DONE.
See? I told you that this is a SIMPLE project. And this time of year, SIMPLE wins. 

Wouldn't a cup full of these pencils be adorable on your desk at work? You could even add them to ballpoint pens if that suits your needs better. (Except everyone will WANT to walk off with your pens or pencils!) 

Today's post is part of Impression Obsession's Die Cut Obsession Blog Hop. The design team is sharing die cutting magic today, and I hope you'll head over to the IO blog and find the list of participants! I can't wait to see what they've each created for today! 

Supplies: 

Impression Obsession - Ghost Die | Boo Die 
FSJ - Fall-O-Ween Prints Paper | Pumpkin Patch Bows


The bows I used were Pumpkin Patch Bows from Spellbinders, which are no longer available - BUT, good news...you can find identical bows on Amazon. 


Looking for more Halloween inspiration with these dies from Impression Obsession? Check out this blog post: 


Sunday, September 1, 2019

Make Darling Diecut Pencil Boxes with Impression Obsession

Welome to Day 2 of the Impression Obsession Fall Die Release Blog Hop. We're celebrating the sweet and spooky, plus the warm and cozy in this release of diecutting goodness! 

This blog post contains affiliate links. If you shop through my links I'll receive compensation at no cost to you. Thank you from the bottom of my crafty heart!
If you joined me yesterday, you saw the Stitch Tag #2 die set already - so here's further proof that this die set is just so dang fun and easy to add to cards. I'm always ALWAYS a sucker for stitched diecut edges and this tag set is awesome! It also creates the perfect landing spot for the bold cursive HI. (And at 25% off, this versatile die is an amazing deal!)

Next up - look at the cuteness of this new die set . . .it's the Pencil Favor Box Dies. I've created two different boxes for you but there are so many ways you could create these boxes! They'll make great classroom gifts for kids at school, plus holiday gifts and party favors or little goodies for coworkers!
 I decorated the Halloween Pencil Favor Box with the brand new BOO die set. And I created a little clip for the top, using the Holiday Icons stamp set. I stamped and trimmed the pumpkin and then attached it to a paperclip.
 The next pencil favor box is back to school themed. Darling for little teacher welcome gifts or first day of school goodies. I decorated this one with the In the Classroom stamp set. 

Each pencil box holds four pencils. I always stock up on cute pencils throughout the year when they go on clearance after holidays for stocking stuffers, Easter baskets etc. Grab them super cheap and then make these darling boxes for all year long!

So, let's talk about the blog hop specifics. There's some good details here you don't want to miss:


  • The blog hop is TWO days - (August 31- September 1) 
  • Every single blog will have a $25 gift certificate to give away for the event - so the more you comment, the more chances to win! All comments for all of the event days will be open until Thursday September 5th at midnight CT. All winners will be announced on Friday September 6th.
All of the new dies are available now! You can find them all HERE on the Impression Obsession website.  

And now, be sure to keep hopping along the way to the lovely Lynda Pleckan

(And head back to the Impression Obsession blog so you don't miss a stop along the way!)


Wednesday, May 8, 2019

Floral Watercolor Handmade Card and Gift Box Tag

Hello my crafty friends! I have such a sweet handmade card and matching tag to share with you today, that I created with Spellbinders Lovely Lilac Die Set. It's part of the Good Vibes Only Collection by Stephanie Low, and it is STUNNING. There are so many possibilities with this truly lovely die set, and I can't wait to explore more ways to use it. But for today - let's talk about the watercolor technique I used.

(This post contains compensated affiliate links at no additional cost to you. Thank you from the bottom of my crafty heart, for supporting me when you purchase through my links!)
On today's projects, I started out with a watercolor sheet. I grabbed my watercolor pencils and a water brush and I started layering color onto the sheet. 

My plan was to eventually die cut the outer flower shape from this sheet, so I was looking at the die and holding it up near my paper to get an idea of where the leaves would be and where the flowers would be - but I wasn't TOO concerned with colors blending and layering. I just kept brushing color on and letting color drip onto the sheet. This is definitely a playtime activity. Don't stress about it! 
Once the sheet was dry, I die cut the shape from it. Since I had enough room, I die-cut it again. (That's when I decided to do a coordinating tag!)  Next, from black cardstock I die-cut the second die - the line shape that overlays on top. THIS is where the magic happens! It made all that jumble of watercolor come to life! AMAZING!

The colors are so bold and bright that I wanted to keep the rest of the card and tag pretty simple. Embossed sentiments in black and white, some black and white patterned paper, plus a contrasting pink card base and this project came together beautifully. 

This idea could be recreated with any sentiment you need - wedding gift, Mother's Day, even birthday or Easter! 

And seriously, how cute is that To Go box? These boxes are perfect for gifts and party favors, food or food treats. They'll fit a couple cookies, a slice of cake, or some fancy leftovers from a dinner party.  You can stamp on them or decorate them, but I kept mine simple with some ribbon and that sweet tag. 

Before I send you along your crafty way, I want to remind you about the Spring Super Sale at Spellbinders - seriously, you guys. I don't ever want you to think I'm all about pushing product - but if there's an awesome sale, I AM going to tell you! And THIS...is an awesome sale - especially because so many regular consumable items are on sale. (Even some tools and adhesive!)  It's a great time to stock up on things you always need, plus grab some fun new goodies at a great price. (Sale ends May 9, 2019)


Project Supplies 


 I'm so grateful you stopped by today! I hope your day is beautiful and crafty and filled with good things. Is there a project or a technique or a Spellbinders + FSJ product you'd like to see showcased on my blog? Let me know in the comments or shoot me an email, and I'll do my best to make it happen! xoxo

Let's stay in touch! Follow me on Facebook, Instagram, and Pinterest where I'm sharing crafty goodness every day of the week! Don't want to miss a blog post? Click subscribe up in the sidebar!

Looking for more crafty goodness from Spellbinders + FSJ? Check these out!