Showing posts with label party decorations. Show all posts

Wednesday, February 20, 2019

How to Make St. Patrick's Day Decorations and Letter Board with Die Cuts

St. Patrick's Day comes and goes pretty quickly, so let's make some simple and festive St. Patrick's Day decorations plus my favorite accessory for every occasion, my letter board.  Today I'll show you how to make this LUCKY banner, which comes together so simply with alphabet dies and the pennant or banner dies. Then we'll add a few other coordinating projects to match!

This blog post contains affiliate links. When you shop through my links, I may receive compensation at no cost to you. Thank you from the bottom of my crafty heart!

Below are some closeup shots of the banner. To recreate this project, here's the simple steps:
  1. Die cut one a large pennant seven times from green cardstock. (I used FSJ Limeade Splash.) 
  2. Die cut seven of a smaller pennant from patterned paper. (I chose this pretty plaid print from FSJ's Create and Bloom paper.
  3. Next, die cut the letters, and the shamrocks (Alpha Bold Steel Rule Die, and Lucky Clovers Die Set
  4. Then assemble the banner. Punch holes in the corners and string together with twine or ribbon.


Next, I decided to make a few other little goodies with extra pieces I had diecut. I made a striped treat bag and added a tag that matches the banner. And then just a quick coordinating card to finish of the ensemble. 
And lastly, I have one more little decoration to go along with these projects. I decorated my FSJ Letter Board with a few more die cut shamrocks, plus a medallion made from the Paper Fan Die
And now, I think I'm ready to drink a Shamrock shake, and celebrate the season of leprechauns and rainbows! Thanks so much for stopping by today! Have a LUCKY day! xoxo

Was this your first time here? Let's connect againFollow me on Facebook, Instagram, and Pinterest where I'm sharing crafty goodness all week long

Supplies on today's projects:


Wednesday, December 12, 2018

How to Make a Festive Christmas Banner with Die Cut Letters

Okay you guys. Today's crafty goodness. 
It's a darn cute one. 
(If I do say so myself...) 
And it's a darn simple one. 
So would you mind, for a moment if we pause to talk about the REAL showstopper here? 
It's not the Ho Ho Ho garland. 
(Although it IS cute. And simple. And we'll get to that.) 
And it's not the Willow Tree nativity which is the first holiday decoration to go up, and the last to be put away each year.
No. 
It's THIS PIANO.
Do I play the piano? 
No, no I do not. 
But do I LOVE this piano? 
Well, yes. Yes I DO.
This piano has been in my parents' house for as long as I can remember. Prior to that, it lived in the restaurant my dad owned when I was a little girl. And before that, it belonged to the restaurant's previous owner - who used this piano during his time as a Vaudeville performer. WHAT? So much history in this sweet old piano. I love every single scrape and blemish, and there's no way I'm repainting it. It hasn't been tuned in about a million years, (but we've already covered the fact that I don't play the piano, so I wouldn't know if it was in tune or not.) 

Okay. Thank you for indulging me as I ramble about my piano. I wasn't expecting it to come live at my house when we went home for Thanksgiving. But somehow my parents tricked us into taking it....parents are sneaky like that. But I'm thrilled to have it here now. (And it's RED! HELLO.) 
Plus, bonus - my nativity looks amazing on top - AND I had a darling place to display today's super fun and simple craft! (See, I told you we'd get back around to that.) 

To make this banner, I used FSJ's Alpha Bold Steel Rule Die. This die set is AMAZING to have in my stash. We've used it for banners, and Science Fair projects, to make personalized gift tags - all kinds of things. The set comes with three platforms to accommodate the whole alphabet. (These are the thick dies, like what teachers use at school for bulletin boards!) 

Here are the simple steps to make a HO HO HO garland: 

  • First, trim red and green cardstock into pieces about 3x3.5 in. Lay them just onto the letters you want to diecut, (in this case, H and O) and run through the die cutting machineTIP: You can die cut quite a few layers of cardstock all at once, which makes this really fast! These steel rule dies are POWERFUL! 
  • Adhere each H and O pair together using one or two small foam adhesive squares. 
  • Punch a hole in the top corner of each H and O and then string together onto twine. TIP: You could easily add a die cut star or heart in between each, but I forced myself to keep this REALLY simple! 
  • Find a fun place to display your darling creation! Easy peasy! 

Alright friends. If you've made it through this blog post, kudos to YOU. Your prize, should you choose to accept it is this...
Today and today ONLY all of FSJ's steel rule dies are 50% off. 5-0. Fifty. FIFTY. That is an AWESOME deal. This alphabet die set is an investment, but it's 50% less of an investment today! And you might just find you use it for all KINDS of things! (I hope a cutie patootie Ho Ho Ho banner is project number 1!) 

Every day this week FSJ and Spellbinders each have an awesome Daily Deal that you won't want to miss. So tell me...what will YOU create with this Alpha Bold Steel Rule Die? And what other steel rule dies do you have your heart set on? You can find all the steel rule dies in the FSJ shop! 

Happy shopping my friends! (I am truly sorry to enable you...but I would be remiss to not have shared this great deal with you!!!!) ;) xoxo

Monday, May 2, 2016

Monster Treat Bag Trio (Fun Stampers Journey}

May! May! May! April absolutely FLEW by in my household. A few days at Disney World with the family, and then I spent a few days in Phoenix helping to get the brand new FSJ catalog together . . . . coming soon! And then I high-fived my husband as I arrived home and he left for a few days at a conference. Then, this weekend I celebrated my birthday, plus our anniversary (on the same day!) PHEW! April was gone in a BLINK. 

So, let's chat about MAY, shall we!? The giant Happy Sales retirement sale is going on over at Fun Stampers Journey, and everything retiring is now 40% off, while supplies last! For today's treat bags, (ack! These are from the Spring Mini catalog - I hope you have some left!!! If not, they'd be adorable on a box or card too!) I used the Greetings Earthlings stamp set (SS-0042)   I paired the friendly aliens with a sentiment from Little Big Greetings (SS-0052) (also retiring!)


Thanks so much for stopping by today! I hope your month of May is off to a BEAUTIFUL start! xoxo

Linky-doo's for you:
Find the retirement list HERE.
Have you seen the May Bloom Box?! Find it HERE!
Check out a variety of graduation projects, and more info on the retiring products on the FSJ blog!

Wednesday, February 24, 2016

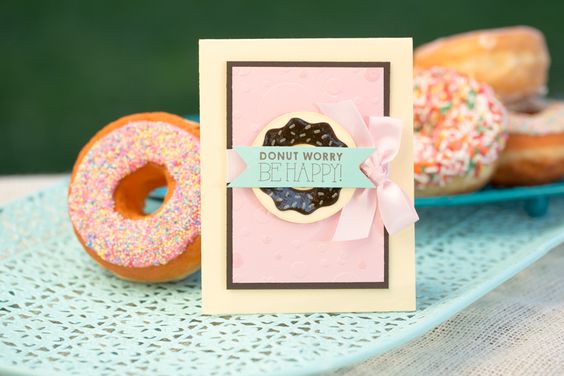
Donut Worry! {Fun Stampers Journey}

Hey friends! Need a little pick-me-up on this Wednesday morning? How about some donuts?
The real ones might be filled with sugar and calories, but the donuts I created are completely fat-free! 
I hadn't seen theses projects photographed until just recently, and I'm pretty sure I gasped when I came across them on Pinterest - the photography looks gorgeous! (and delicious!) One of the best perks of my job at Fun Stampers Journey, is that most of the time the projects I create get boxed up and shipped out to the office in Phoenix, and the Journey Crew works their magic and photographs them for me. (I LOVE that!!!) 


I had fun creating these food picks to stick into the donuts! I made a bunch of these and my son celebrated his birthday (which fell on a Sunday this year) with his church pals and donuts!I put a layer of Journey Glaze (dimensional glaze) over the frosting so they look shiny and delicious! Once they were dry, I hot glued them to cake pop sticks. (White craft glue works quite well too - but I was prepping for a birthday party at the last second of course! I love turning to hot glue when I need a QUICK dry!)

And on this last card, yep, it's the same donut as the food picks...just stuck onto a card! So fun!

You can find the Donut Worry stamp set and coordinating dies on the Fun Stampers Journey website. And for more inspiration, check out Fun Stampers Journey on Pinterest, Instagram, and Facebook

Thanks so much for stopping by today! xoxo


Sunday, December 28, 2014

Favorite Posts of 2014: By The Sea party ensemble {featuring Graphic 45 and Sizzix}

Hello friends! Welcome to day 2 of my favorite posts of 2014. We'll be looking back at some of my favorite projects, tutorials, and posts of the year as we prepare for a new year of crafty goodness in 2015! Thanks for joining me! 

Hello friends! The Fourth of July weekend is just about here! We'll be spending the weekend out at the beach, enjoying a view of the ocean and the sand in our toes. It's only a 20 minute trip from our house, so we go there fairly often, but there's still something about the July 4th weekend that makes the summer beach scene extra magical! 

Today I'm sharing this summer party ensemble on the Paper Crafts & Scrapbooking blog. I used Graphic 45's By the Sea collection, and YOU have the chance to win it over on the PC&S blog (so if you haven't been there yet, click on over for a chance! There are more pictures of these projects too!)

As I promised over there, I have more details, and supply lists here in case you'd like to try this yourself.  First up, the banner. I LOVE using my Sizzix Framelits pennant dies to create party decor. It is so easy to create pennants using any paper you choose (or even felt or foam!) There's a scalloped die, and a straight edge die, so I die-cut one of each and layered them. You can see I alternated sizes between small and large. I used a small hole punch on each corner and then I threaded twine through each pennant. (Yes, it's my favorite May Arts burlap string. . . seriously, it matches EVERYTHING. I'm obsessed, which you might already know!) Then I just added some chipboard embellishments, and pinwheels (also a die, which is from The Cat's Pajamas.)
Next up, the drink bottle. This is just a recycled Starbucks Frappaccino bottle. Sometimes I save things, even though I'm not sure why. . . .and this was one of those saves that worked perfectly. A mason jar would have been fabulous too. I jazzed it up with burlap, twine, and chipboard. This would be fun to personalize for each guest, maybe with names or initials too. (You could even let them take it home with them!) 


Next we have the cute little place setting bag. Wouldn't this be fun (and handy) when serving up a BBQ or buffet? Guests can grab a bag and have their napkin and utensils contained in this cute little bag (this one is from Fancy Pants.) Again, I just decorated it up with goodies from the By the Sea collection, a pinwheel die, and twine. 

(And would you like to know a funny secret? The napkin I used for this photo, is a Star Wars napkin with Darth Vader on the other side. It was the only red napkin I had in the house!)


And last but not least, a quick card. . . .because really, how could I NOT make a card? It could be an invitation, or maybe a thank-you card after a fabulous summer soiree. Below, I've linked up the products I've used. If you have any questions, ask away! I'd love to chat with you! And be sure to stop over at the Paper Crafts blog, for a chance to win this paper collection, plus lots of coordinating goodies!  Have a fabulous, safe, and FUN Fourth of July weekend! 

Supplies:
kraft cardstock
Sizzix Framelits pennants dies(from scrapbook.com) or (from Sizzix.com)
Sizzix Framelits scalloped pennants dies (from scrapbook.com) or (from Sizzix.com)
May Arts burlap string (from Simon Says Stamp)

Friday, December 26, 2014

Favorite Posts of 2014: Nautical Baby Shower {featuring Paper Smooches, Sizzix, and Carta Bella}

Hello friends! Welcome to day 1 of my favorite posts of 2014. We'll be looking back at some of my favorite projects, tutorials, and posts of the year as we prepare for a new year of crafty goodness in 2015! Thanks for joining me! 

Originally posted on September 12, 2014: 

I am finally here to share all the details and tidbits of the nautical baby shower that I recently decorated for. WARNING: This post is photo heavy, link heavy, and info heavy! Hang in there!

My sweet friend Sara is having a baby boy in just a few short weeks, and some of her friends got together to host a shower. My job was to decorate and to bake cupcakes, and I had a blast doing both! I have a ton of pictures to share with you, and lots of great links and ideas that I collected along the way.

The Ahoy There collection from Carta Bella, is what jumpstarted this whole theme. I just love the colors, (you might know how I love a pop of AQUA) and I thought the theme would be perfect for a baby boy shower. I like that it all came together in a very non-baby way though - these decorations and theme could have been made for a birthday party, or any occasion really, so don't be scared away by the word BABY!)

The first project I started was the banner. I created a banner for my friend Sara's first child, and it hangs above her bedroom door. So now, the new little mister will have a banner to hang above his room too. Now that his name has been chosen, I'm going to add his name onto the banner and get it ready to welcome him home! Banners are one of the first party decorations I start, because the Sizzix Banner Framelits dies make it so easy and fun. I love to layer them and combine patterns and colors. I added pinwheels and anchors to the banner for fun details.

The next project I created was a framed piece of art to serve as the centerpiece. I created the text in a word processing document, printed it on cardstock and then added patterned paper matting, and stickers to embellish it. I put it in a simple IKEA frame. It reads "Mightier than the waves of the sea is His great love for you." Many people attribute this as a Bible verse, but it's a pretty (extremely) loose translation from what I can find, so I left off the verse number. 
Now, onward to the cupcakes. This recipe is my very favorite. It's absolutely delicious, and although it starts as a cake mix, you'd never know it! They're called Wedding Cake Cupcakes - and thats truly what they taste like! To decorate the cupcakes, I stamped and die cut fun little embellishments and adhered them to toothpicks.


I turned again and again to my Paper Smooches stamps and dies for all of the projects here. The stamp set Wicked Nauticool and the coordinating dies made these projects so fun to create! I also used a stamp or two from Lawn Fawn's Float My Boat set. 

For the party favors, I followed some great tutorials (you can find them on my Pinterest board) to create paper boats. They turned out really cute, although some of them didn't want to stay standing up! I created sails from the Sizzix Banner Framelits, and adhered them to skewers. After forming the boats from kraft paper, I poked the skewer and sail through each boat. Then we filled the boats with Lifesavers candies, for the guests. They also doubled as cute decorations scattered around. 
And finally, as a gift to the lovely mama, I created a coordinated 6x6 scrapbook with the leftover papers I had. I simply cut papers and cardstock into 6x6 blocks, added some simple layers and embellishments, punched holes and threaded twine through. Usually when I create these fun little books, I use metal book rings, but I didn't have any, and I love the way the twine looks. Sometimes they are a little tight to open and close at first, but they loosen up over time. 


Also as part of the gift I created, I made coordinating thank you cards - because hey, what's one MORE project??? I tried to keep it as simple. . . and I love the way they turned out! Paper Smooches anchor die, banner dies, and sentiment dies made it pretty fun to just mix and match. I ended up with a few different combinations. . .these were my two favorites! 


So I think those are the highlights. I always love decorating for parties, but I must admit, I'm always happy when they're over! Sometimes my brain just can't stop thinking about new ideas and projects, and I tend to overwhelm myself! The weekend after this shower, we hosted my five-year-olds Sharks and Fishies party. I'll be working on that blog post next!!!! Thanks so much for stopping by!

Products I used: (affiliate links)
Carta Bella Ahoy There 12x12 Collection Kit
Sizzix Banner Framelits dies and scalloped dies
The Cat's Pajamas pinwheel die
Paper Smooches anchor die
Paper Smooches Wicked Nauticool clear stamps and dies
Lawn Fawn Float My Boat clear stamps
Paper Smooches Banners Dies
Paper Smooches Thanks Die
Paper Smooches Quote Tag (with sentiments)

PS You can find all the things that inspired me on my Pinterest board, Party: Nautical Baby Shower. Many of the products I used are also linked there, as well as products that might be perfect for YOUR next party!