Showing posts with label silks. Show all posts

Wednesday, February 2, 2022

These Two Colorful Cards Are Perfect for Encouragement or Graduation!

Welcome to Day 2 of the Impression Obsession February Release Blog Hop! Today I'm excited to features some beautiful silhouette style rubber stamps paired with inspiring sentiments that together create the perfect handmade card to celebrate all kinds of accomplishments, like graduation, a new job, weight loss, or meeting a hard-earned goal. 

This blog post contains affiliate links. When you shop through my links I receive compensation at no cost to you. Thank you from the bottom of my crafty heart!
Step by step, mile by mile, you have done this! Celebrate the achievements of people you love, with a handmade card. This idea is perfect for accomplishments whether finishing an actual race, graduation, or even finishing a big test. Celebrate successes with these beautiful sentiments and silhouette stamps from Impression Obsession. Stop by my blog for more ideas using these stamps and other handmade cards with stamping and diecutting.
Silhouette images are really fun to play with because they just have so many inky possibilities. Stamped simply in black, they allow you to get creative with backgrounds, using stencils, sponges, ink blending and more. To create today's first idea, blend Distress Oxide Inks across a piece of watercolor paper. Then  stamp the Mountaintop Silhouette image onto white cardstock and fussy cut it to add on top of your colorful panel. Finish the card off with a simple sentiment like Step by Step. 
May your trails be crooked, winding, lonesome, dangerous, leading to the most amazing view. (Edward Abbey) Using stamps from Impression Obsession, you can make the coolest handmade cards to celebrate graduation, or any success or achievement. It might be to congratulate a loved one on an actual physical achievement like running a race or climbing a mountain, or to celebrate graduation, a new job, a big move, or just encourage them along the way. These silhouette stamps are really fun to use with inky techniques using distress inks or the gel press, to make gorgeous backgrounds. Stop by my blog for more ideas using stamping and diecutting!
The next card also has a Distress Oxide inky background, but after inking the panel, lay a stencil on top and mist with water. Distress Oxide inks react with water and magically allow the stencil pattern to appear. Then, simply stamp the image and sentiment onto the panel once it's dry. (I splattered some Spellbinders Sparkle Silk at the end, because it's always my favorite finishing touch!)

I suggest using a MISTI or other stamping platform when using silhouette stamps, because it allows you to get a really rich, dark color on solid images. 
 
Here are the important details on this week's blog hop:

  • We're giving away THREE Impression Obsession $25 gift certificates for our two-day blog hop - the more you comment, the more chances to win, so be sure to visit all the designers! (This is day 2 - find day 1 HERE)
  • All comments for both days will be open until February 8th at 8pm CT. All winners will be announced on February 9th on the Impression Obsession Blog.
  • Find all of Impression Obsession's newest releases HERE
  •  Check out the awesome sale section on the IO website. In particular, their assortment of discontinued clear stamp sets has some amazing deals on THE cutest stamps!

Here's the lineup of today's hop!

Supplies on Today's Cards:

Thursday, December 23, 2021

Elegant and Rich Christmas Card Idea With Glimmer and Gold

Sometimes the timeless combination of bold red and green remains just perfect for Christmas. Especially when there's a pop of warm gold accents. Simple die cutting, a Glimmer hot foil sentiment and a beautiful inky background create today's elegant Christmas card idea.

This blog post contains affiliate links. When you shop through my links I receive compensation at no cost to you. Thank you from the bottom of my crafty heart!
Have you played with Distress Oxide inks? They're fairly new to me and I'm still learning all of the cool effects you can achieve with them. This card got its start with a panel of blended  ink in the beautiful rich red of Candied Apple. After sponging lots of color on, I added a few splatters of water, and a few splatters of Silk. Next up, simple die cutting of a wreath and poinsettias to create an elegant handmade Christmas card. If you're looking for more simple handmade holiday cards with stamping and die cutting, I'd love for you to stop by and find some more inspiration!
Have you played with Distress Oxide inks? They're fairly new to me and I'm still learning all of the cool effects you can achieve with them. This card got its start with a panel of blended  ink in the beautiful rich red of Candied Apple. After sponging lots of color on, I added a few splatters of water, and a few splatters of Silk (in Gold, and also Sparkle - my favorite!)
This idea for a handmade Christmas card is bold and elegant with rich reds and greens. Simple die cutting, and a sentiment is all it takes to create this Christmas card idea. You could create this look on a variety of backgrounds. You could ink any color you like, stamp a background, create a Gel Press print or even just use a piece of red cardstock. This card can be as simple or detailed as you want. Think about how you can take this idea and make it your own!   TIP: You could even change up the colors, sentiment, and add some spring blooms instead of poinsettia to make it a fresh springtime card with the very same layout.)
You could create this look on a variety of backgrounds. You could ink any color you like, stamp a background, create a Gel Press print or even just use a piece of red cardstock. This card can be as simple or detailed as you want. Think about how you can take this idea and make it your own! 

TIP: You could even change up the colors, sentiment, and add some spring blooms instead of poinsettia to make it a fresh springtime card with the very same layout.) 
For this traditional Christmas card in red and green, I die cut the sweet layered poinsettias from Spellbinders' Christmas Blooms die set. This set is absolutely amazing for holiday cards, tags, and crafts. It's a set you'll want to keep in your stash all year long though, because some of those flowers can be used for any season, plus there's some extra leaves and greenery you'll want handy. This set will complement your other floral die sets quite nicely!

Because this IS a traditional Christmas card, I added the sweet layered poinsettias from Spellbinders' Christmas Blooms die set. This set is absolutely amazing for holiday cards, tags, and crafts. It's a set you'll want to keep in your stash all year long though, because some of those flowers can be used for any season, plus there's some extra leaves and greenery you'll want handy. This set will complement your other floral die sets quite nicely!
Are you looking for simple and elegant handmade Christmas card ideas? This card features simple die cutting and an inky background but there are lots of ways to take this idea and customize it for your own taste and supplies. Stop by and see how to make this lovely holiday card, and find suggestions of how to change it up and make it yourself!
Another die for all year long is that sweet wreath. It's not even a holiday die, but it's perfect right? You'll find it as part of the Cameo die set, and I think it is sweet and simple to let those poinsettia shine! 
There's lots of shimmer and shine on today's handmade Christmas card idea. If you love the rich combination of a traditional red and green holiday card, you'll love this one with highlights in metallic gold cardstock and embellishments. Stop by for more inspiration and to see just how to make this card yourself for Christmas!
The last important element of this card is the shiny shimmer of metallic elements. 
  • Silk: We already discussed the splatter of the Gold and Sparkle Silk. It's the perfect finishing touch for every card!
  • Metallic Cardstock: Specialty cardstock creates a big impact. The wreath is Brushed Gold cardstock, and the poinsettia is from Mirror Gold Cardstock - they complement each other well, and create some balance. 
  • Glimmer Hot Foil:For just a little more shine, a simple hot foiled sentiment from the 
  • Fashion Gold Accents: Ohhhh, those shiny 3D dots! They remind me of tiny Christmas ornaments on this card!
Whether your week is festive and chaotic, or calm and quiet, know that you are LOVED and appreciated! I hope you get some crafty time in this week! Merry Christmas to YOU! xoxo

Thanks so much for stopping by today! There's lots more inspiration to share so subscribe so you don't miss a blog post! 

Shop the Supplies on Today's Card:


Tuesday, September 28, 2021

5 Colorful Ways to Add Watercolor to Handmade Cards

Do you like to add watercolor to your handmade cards? Or does it stress you out because it feels messy and unpredictable? Today I'm going to challenge you to take a risk, and add a splash, splatter or streak of bold, beautiful watercolor to your card making and paper crafts. I'll show you three simple products that have become some of my favorite ways to watercolor,  and I'll show you different ways to use each one. 

This blog post contains affiliate links. When you shop through my links I receive compensation at no cost to you. Thank you from the bottom of my crafty heart!

The three products that might just change your opinion about watercolor are all from Jane Davenport: Inkredible Inks, watercolor tins, and Mermaid Markers. And if you're already a watercolor fan - you are in for a TREAT if you aren't familiar with these products; they may just become new favorites!
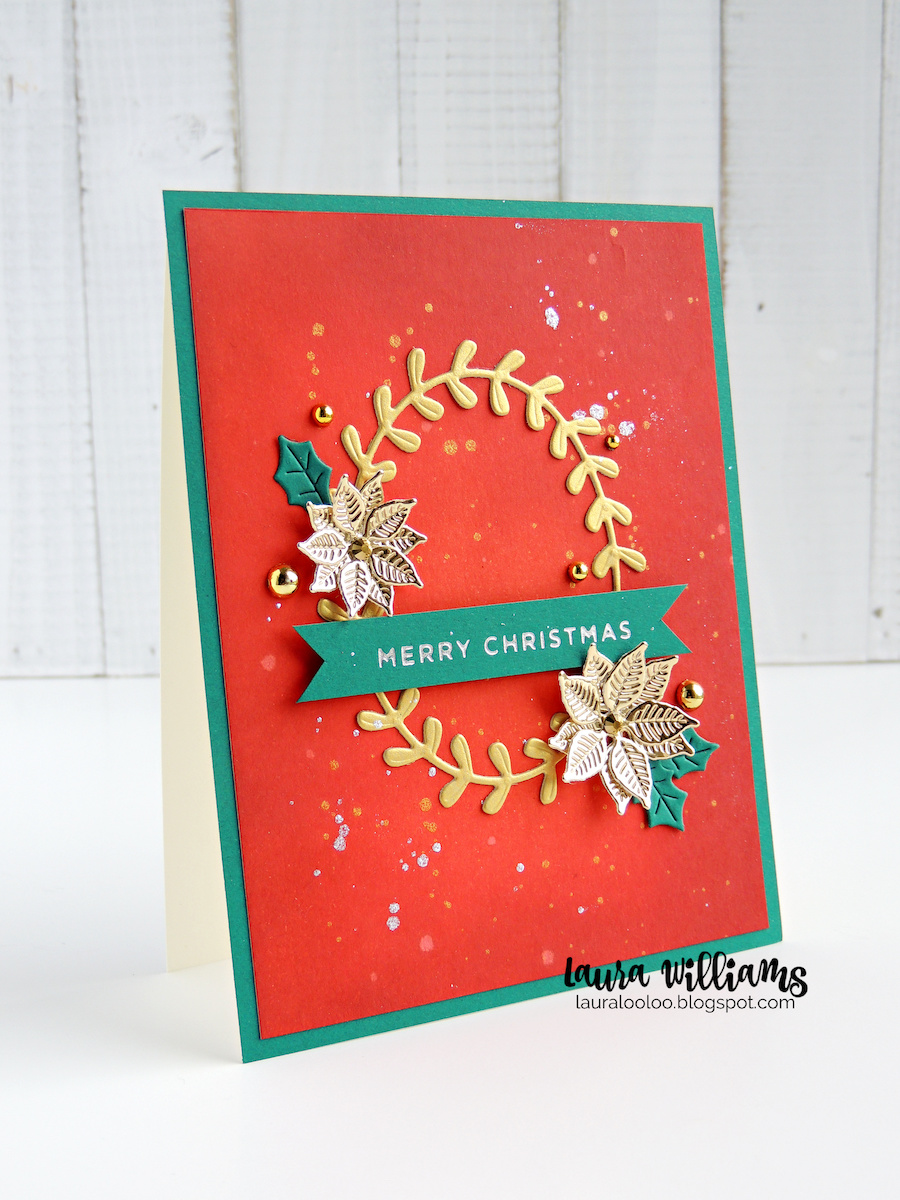
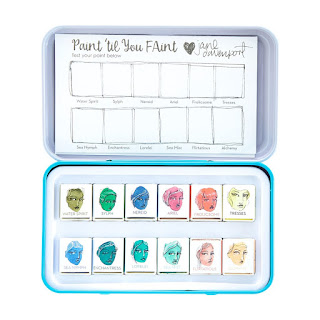
Hey there my crafty peeps, how are you today? I am completely in love with my new little watercolor tins and I am watercoloring all of the things lately. Today, I have a fun little rainbow idea to share with you, featuring the Magical Unicorn stamps from FSJ + Spellbinders. You can use this idea with whatever type of watercolor medium you have - even liquid dye inks. Are you ready to take a look with me?

Find more details about this card HERE 

Watercolor Set

First up, let's take a look at the watercolor tins. This is probably the most familiar type of watercolor. We all used Crayola watercolor paint sets in elementary school, so this style might feel less intimidating.
  • The color is exceptionally rich and vivid
  • Highly concentrated: A little bit of paint goes a long way.
  • The tins are adorable!
  • The colors mix and blend beautifully for unlimited possibilities
  • There are three color families: Brights, Glitz-Sea, and Neutrals
Use these paints in a traditional way, with a brush and loosely paint a stamped image, like in the Plant Lady card below. Or get a little crazy with these and make a rainbow puddle of colors, like in the card above. To create that background, mist a sheet of cardstock with water, and then lay colors down with a brush, allowing them to mix and blend just a bit. Bonus points for this technique: You'll never create exactly the same look twice!

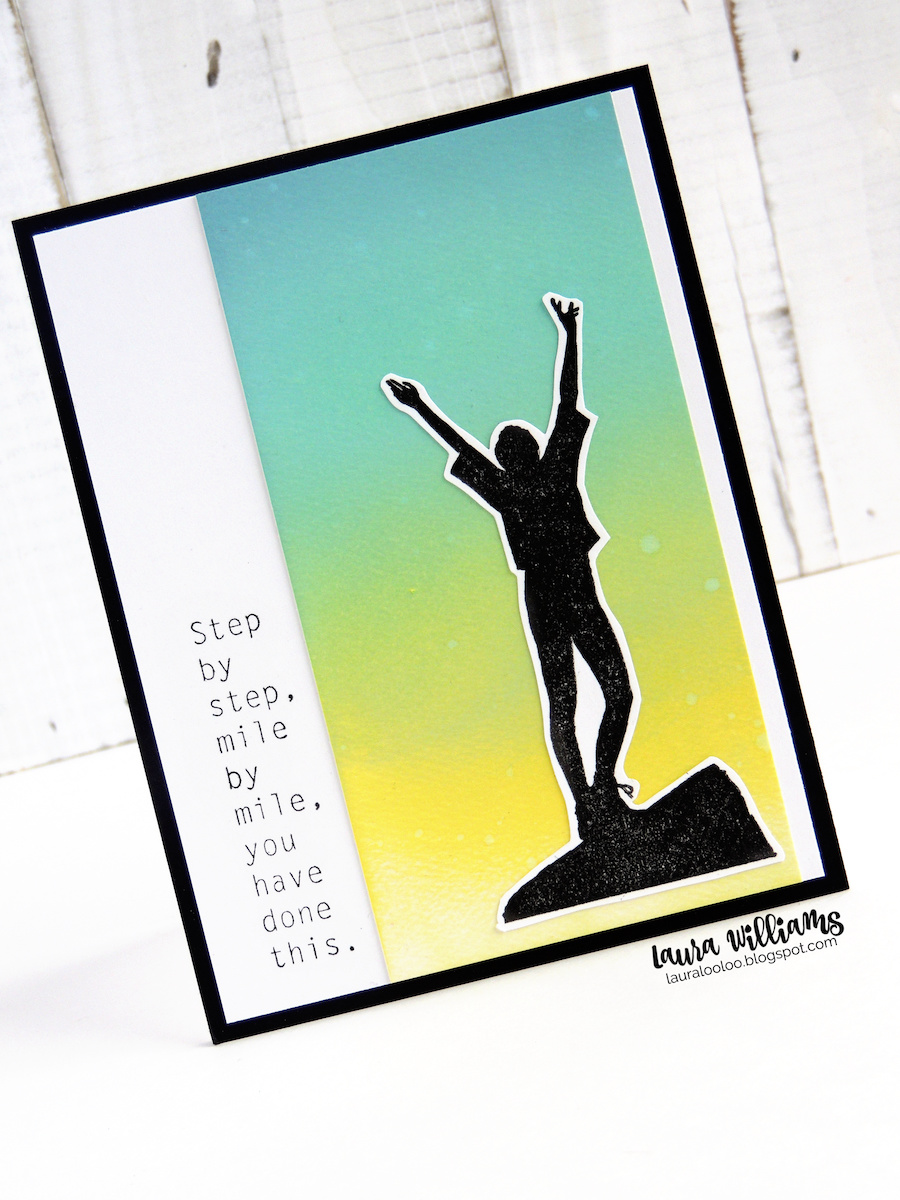
Find more details about this card HERE

Mermaid Markers

The next two types of watercolors are liquid. Mermaid Markers might look like regular markers at first glance, but loaded with highly pigmented liquid color and capped with a brush tip, they are so much more. You can brush color straight onto a project, but I recommend pairing it with water to dilute because once again, a little goes a long way!

To create the color wash on the polar bear card below, mist watercolor paper with water (much like the unicorn card above) and then drip the slightest bit of Mermaid Marker onto the paper. It will immediately bleed and blend with the water. Tip the cardstock to move the color around and add more color as desired. You could add a drop of other colors too. 

One of my favorite techniques with all of the watercolors is to add a splatter of Sparkle Silk while the watercolor is still wet. Spellbinders Silks will interact with the water and add fun bursts of color or sparkle onto the paper. On the polar bear card, you can see some spots where the Silk actually caused circle spots that resisted the blue. It also adds a glittery shimmer that spreads when wet, but looks more like a paint splatter when it hits dry paper. 
Find more details about this card HERE

Inkredible Inks

Man, these might be my favorite of today's watercolor wonderland. Jane's Inkredible Inks are liquid dye-based inks in bottles, that come in 12 gorgeous shades. The colors are so vivid and cheerful that I just can't resist them. Use them straight from the bottle, dilute with water, put them in a spritz bottle - you can't go wrong with these lovelies.

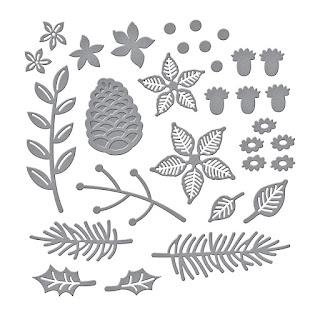
My favorite way to use Inkredible Inks is to create sheets of vibrant color to die cut. This project begins similar to others: mist a sheet of watercolor paper. Then add a drop of color and watch what happens. These inks interact with water, and you'll have fun experimenting. Let color dry halfway, and then add drops of water on top, or spritz with water. Let colors mix and blend. And of course, splatter with Sparkle Silk. 

I like to focus on one color family per sheet, pinks and purples, blues, greens etc. That way I have a whole sheet I can cut green leaves from or purple/pink flowers from. Below you'll see a few of the sheets I made, and then the card I created once the papers were dry and I die cut them.

Find more details about this card HERE

Which Is Your Favorite?

All three options of watercolor: dry watercolor sets, Mermaid Markers, and Inkredible Inks in a bottle, are exceptional quality, incredibly vibrant and concentrated colors, and have plenty of opportunities for play and experimentation. Right now is the BEST time to try some of these, because all of Jane Davenport's collections, (including her inks, paint, stamps, pastels, and more) are part of a pretty amazing sale right now, where you'll grab deals at LEAST 60% off! 
For the background stripe on this card, I started with a piece of watercolor paper. Next, I loosely spread some water onto it, and then I dripped and spread Jane Davenport Inkredible Inks onto it. I love the way the colors blend and spread and make magic every time. After the panel dried, the rest of the card was easy peasy! I put together some of the images, added a little more color and assembled it for a fresh springy card.
Here's one more Inkredible Ink card. I created the background, and then colored the leaves and flower's center with a paintbrush. Find more details about this card HERE

The Jane Davenport Sale lasts through October 3, 2021. I hope you'll check it out because it's really the BEST deal you'll find on these awesome watercolors - plus lots more! Before you go, what questions do you have about watercolor? I'd love to hear your thoughts in the comments. 

Shop the Supplies on Today's Projects:

Brights Watercolor Set from Spellbinders / Jane Davenport


Color Splash Sheets watercolor paper sold at Spellbinders

These splendiferous dye-based liquids are updated! New bottles, new formulations, updated colors and unscented. These still dry to a semi-permanent state. Think of them as super-vivid and layerable watercolor that you can paint, splash, daub, stain, spray, spritz, stamp and draw with! Use these 12 luscious Jane-fave colors in Inkredible® Pens, Aqua Brushes, Ink Brushes, Fine Line Bottles and Mister Bottles. Use full strength or dilute with water. A perfect way to add color for mixed media, art journals, cardmaking and more. Contains 1oz.


Jane Davenport Inkredible Inks - this link takes you to all the amazing colors!

Just like a mermaid, Jane’s 12 dye-based watercolor inks, in easy-to-use water brushes, are highly water-reactive which means you can get all sorts of creative effects effortlessly and every drop of water goes a long way!

load with water and use with dry watercolor, or to dilute liquid watercolor, you can even add drops of Mermaid Markers or Inkredible Ink and water into the brush

Want to see one more fun watercolor idea? Paint a card about watercolors with watercolors. 
Mind blown!
Hey crafty friends! Do you like to party? I'm pretty sure you like to party the same way I do . . .by doing something creative or crafty (preferably while in your pajamas and eating chocolate, but that's besides the point.) If your idea of a party is being artsy, you'll LOVE the stamps on today's handmade card! They were made just for us!

Find out more details about this card HERE

Thanks so much for stopping by today. Let's connect again - subscribe so you don't miss a blog post! 

Thursday, November 19, 2020

Colorful Florals Plus Black Friday Deals!

 HELLO crafty friends! I have so much to share today. We're going to dive right into some inky and diecutting goodness on today's card. 

If you read my blog frequently, you may notice this statement: "Today's blog post contains affiliate links.  When you shop through my links, I receive compensation at no cost to you. Thank you from the bottom of my crafty heart." I want to stop and say THANK YOU. When you click on a link and you make a purchase, I actually do a happy dance, and I really DO appreciate it. I can't see WHO makes the purchase, so I can't thank you personally. My hope is that you find value on my blog, and that you choose to make purchases through my blog/social media links. Whenever you click on someone's links and do some shopping, I hope you know that you are supporting a crafter! {Puffy hearts to YOU!} 

Okay - on with the goodness!

Handmade Card Idea: Add color to watercolor paper using Jane Davenport Inkcredible Inks. After letting it dry, die cut flower shapes and layer together for paper crafted elements for handmade cards, treat bags, favor boxes, tags and more. The stamps and dies from FSJ + Spellbinders are perfect for this handmade craft idea. #papercrafting #watercolor #diecutting

I had some inky fun with the Bloom Creator and Blooming Details dies, using Jane Davenport's Inkredible Ink. I began by creating some vibrant, colorful watercolor sheets. 

FIRST, mist water onto a sheet of watercolor paper. Then drip Inkcredible Ink onto the sheet. It interacts with the water, spreading and bleeding. Add more color, add more water. Move the paper around to let it mix more. Just PLAY and see what you like! Splatter some Silk onto it before it dries and after. (Sparkle Silk is my favorite!)

These are the three sheets that I created. You'll notice the green sheet has some pattern on it. After coloring the sheet, I layed a stencil on top and misted it with water. The ink interacts with the water and does MAGIC. It's such fun. I also dripped water onto the sheets as it was partially dry. Just PLAY, I'm telling you! 
Try this handmade card making technique using watercolor paper and concentrated dye inks (I used Jane Davenport Inkcredible Inks) Click to see just how I created this handmade card with watercolor paper and dies from FSJ + Spellbinders. #funstampersjourney #cardmaking #handmade
Once the sheets were dry, I began die cutting the layers of flowers and leaves. I did all of this from the three sheets, and I have some scraps left over for other projects. I used a hole punch to cut out the little dots around the scene. 
Click here to see ideas for using liquid dye ink, like Jane Davenport Inkcredible Ink, to make beautiful and vibrant die cut flowers for handmade cards and crafts, using stamps and dies from FSJ + Spellbinders. #handmadecards #spellbinders #cardmaking
There was so much going on that I kept the background and sentiment super simple. A few enamel dots finished off the flower centers. I bent the edges of the flowers for some extra dimension. The best part of this project, (other than the fun flowers and the bright colors) is that all of the stamps and dies I used for this project are on clearance marked at AMAZING prices, in the Spellbinders shop. 
Try this watercolor idea for handmade cards! Click here to see an idea using watercolor paper, dye inks (like Jane Davenport Inkcredible Inks) to make die cut flowers and greenery for handmade cardmaking, paper crafting, treat bags, tags and more. These vibrant colors are beautiful and this project is such fun! Stop by my blog for all of the details.


Shop the Supplies on Today's Project: 


Bloom Creator Die Set


(I used Limeade, Mermaid Tail, Violet Syrup, Fairy Floss, and Berrylicious)


Thank you so much for coming by today! If this is your first time here, let's connect! You can find me on Facebook, Instagram, and PinterestPlus subscribe to my blog so you never miss a post, right up there in the sidebar!

Thursday, August 13, 2020

Take a Bite Into These Shark Week Card Ideas!

Where are my Shark Week friends!? Raise your hands up high! We wait ALL summer long for Shark Week on Discovery Channel, so I couldn't help but do some Shark Week crafting to celebrate the summer occasion! I mixed a brand new product with my favorite shark stamp set for a fresh new underwater card. Let's dive in!

This blog post contains affiliate links. When you shop through my links, I may receive compensation at no cost to you. Thank you from the bottom of my crafty heart!
Colorful and fun handmade cards to celebrate Shark Week with the Shark Attack red rubber stamp set from FSJ. Make an underwater inspired card using the Sunny Day stencil and liquid colors ink to make the background and then add a simple stamped shark on top. #funstampersjourney #cardmaking #lauralooloo
Shark Attack is a really fun rubber stamp set from Spellbinders, perfect for a variety of cards, but especially for summer birthdays, masculine cards, and of course - Shark Week fans! But let's talk about this background for a minute, shall we? 

To create this look, follow these steps (specific supplies I used are in parenthesis):
  • Spritz water lightly over a watercolor sheet. 
  • Using a sponge dauber, spread liquid dye ink over entire sheet (FSJ Liquid Colors - Cool Pool) 
  • Using a sponge dauber, add a darker shade of ink around the perimeter of the watercolor paper. (FSJ Liquid Colors - Turbo Teal) 
  • Lay sun rays stencil onto panel and sponge dark color over it. (FSJ Liquid Colors Catalina Splash)
  • Splatter with FSJ Silk, ink, or paint. (FSJ Sparkle Silk) 
Live Every Week Like It's Shark Week - Shark Week 2020 handmade card with FSJ's Shark Attack stamp set. Make this fun handmade card with simple stamping and a stenciled inky background with products from Fun Stampers Journey. Stop by my blog to see all the details! #funstampersjourney #cardmaking #sharkweek
I love that the sun ray stencil has a purpose more than just sunny sky scenes. I've been seeing it used in so many creative ways, and I love the way it looks as part of my underwater scene. There is a circle shaped sun in the center, but it was perfectly hidden under the shark! Perfect, right!? 

I also love the addition of the Rainbow Drops on here. They are the perfect bubbles to finish off this scene.

Thanks so much for stopping by today! There's still time to get in on Shark Week while it's going on! And thankfully it's always the right season for crafting up a cute shark card for someone special! xoxo 
Make a shark week card with rubber stamps and stencils from Fun Stampers Journey. The Shark Attack stamp set is perfect for underwater themed handmade cards for birthdays and shark week 2020! #cardmaking #rubberstamps #sharkweek2020Supplies on Today's Card:
Shark Attack Stamp and Die Set
Product Note: The Shark Attack Stamp Set is no longer available, but LOOK at all the adorable shark stamps and dies sold at Simon Says Stamp! There are so many cute options!

Looking for more Shark Week inspiration? Check out more sharktastic cards on my blog. Find all the details on these two projects here: https://lauralooloo.blogspot.com/2019/07/craft-every-week-like-its-shark-week.html
Make a shark week shaker card with the Shark Attack stamp set from Fun Stampers Journey. Click to find all the details about this project!

Make a clean and simple handmade birthday card for the shark fan in your life, with the Shark Attack stamp set from FSJ. Also perfect for Shark Week fans, you'll love crafting with this fun summer stamp set. #cardmaking #funstampersjourney