Showing posts with label mixed media. Show all posts

Thursday, September 3, 2020

Sending You Sunshine with Bold Watercolor and Pastels

Think about your elementary art class. Do you remember the fun project where you color hard with crayons and then watercolor over them? It was pure magic the way the crayon would resist the watercolor (especially if you used white crayon and dark colors of paint!) Today, my fine crafty friends I have the card maker version of that project and it is SO simple. Can I show you!? 

This post contains affiliate links. If you shop through my links, I may receive compensation at no cost to you. Thank you from the bottom of my crafty heart!

Ideas for adding pastels and watercolor to handmade card making projects and crafts, with Jane Davenport products at Spellbinders Paper Arts #cardmaking #rubberstamps #watercolor
To begin this project, I stamped the beautiful orange blossom cluster from the Orange Blossom stamp set. (I would be remiss to tell you, I happened to see this set on sale in the Spellbinders shop.) 

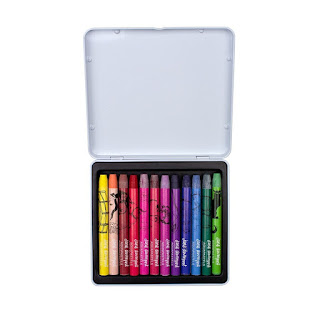
After stamping the image, I used Jane Davenport's Power Pastels to loosely color the image - including white on the white flowers. That's an important part!  

Last, I grabbed the adorable petite palette of Watercolors Set Brights, also by Jane Davenport and brushed beautiful yellow watercolor over the whole image. Guess what happens? Just like that elementary art project, the pastels resist the paint and my white blossoms are STILL WHITE! And y'all, let me tell you - these watercolors are SO vibrant and the colors are just completely brilliant. I'm in love. 

After the project dried, I stamped the sentiment. (I got a new black ink pad, doesn't it look marvelous!?) 

Catch this quick little video to see this process in action:

One of the things I love about mixed media products, like Jane's variety of pastels and paints, is that there are so many fun ways to add COLOR. 

For the next Orange Blossom project, I used Jane's AquaPastels. What are AquaPastels, you might ask? Please, let me tell you - because they are like MAGIC. They're lovely little crayons that are super fun to scribble with. 

Add a little bit of color to an image, like I did to create these lemons. (Did you notice I took oranges and made them lemons?) Then, add just a slight swish of water and MAGIC (yep, more magic) it blends the scribbles into watercolor. After that, I went back over it and added one more layer of scribble to the lemons and leaves. 

Click to see a fun watercolor lemon card using stamps from Spellbinders and watercolor crayons from Jane Davenport, called AquaCrayons. #cardmaking #mixedmedia #janedavenport

Adding these fun products to handmade cards can be a little intimidating but it's so much fun. It doesn't have to be messy and busy and lots of work. These one layer cards are simple and crisp but have a fun pop of these colorful, bold products from Jane Davenport. 

I'd be remiss if I didn't mention. . . .there's a whole bunch of JANE on sale in the Spellbinders shop beginning today so it's kind of the perfect time to take the plunge and add some COLOR to your craft stash. I think you'll just love Jane's array of watercolor tins, pastels, chalks, and more. 

Supplies used on today's projects:
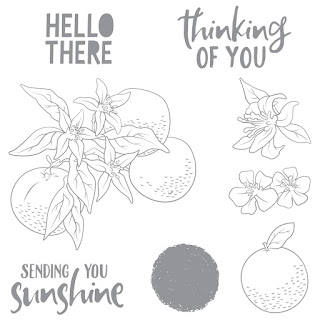
Orange Blossoms red rubber stamp set from Spellbinders

(I didn't use it today but there's also a coordinating die set)

Watercolors Set Brights from Jane Davenport


Jane Davenport Power Pastels

AquaPastels Watercolor Crayons from Jane Davenport

Looking for more Jane? 

Check out this post that features another of my favorite watercolor products from Jane Davenport!

Monday, August 10, 2020

How to Use Watercolor for a Bold Winter Background

Hello my crafty friends! I have a stunning and simple winter card to share with you today. One stamp set, one watercolor marker, a little water and one ink pad. It's all you really need to create this beautiful card. Let's take a look and I'll show you just how to create this! 

This blog post contains affiliate links. When you shop through my links I may receive compensation at no cost to you. Thank you from the bottom of my crafty heart! 

Make a cold and crisp handmade card for winter using watercolor and polar bear stamps from the Arctic Wonder stamp set from FSJ #cardmaking #wintercrafts #spellbinders #funstampersjourney
This card is all about the background. The beautiful watercolor background makes the perfect landing spot for these sweet polar bears.  Want to create this background? Here's how to do it:
  • Begin with a piece of watercolor paper. Spritz or mist lightly with water. (I find it helps everything blend and get happy a little easier if I've given it a little spritz to begin.) 
  • Make a little puddle of water on the sheet (wherever you want to begin) and add some watercolor to it. I brushed in a little Jane Davenport Mermaid Markers. They're highly concentrated dye watercolor ink, with a brush tip. You could add a drop, squirt, or swish of any kind of watercolor paint or even watercolor pencil that you have. Allow the color to move around and play with it a little and then let it dry. (Use a heat tool if you're impatient like me!) 
  • Once it's dry (or mostly dry) repeat the process. Add another puddle of water and add more color. Keep doing it until you're happy with what you've got. I added in some Sparkle Silk along the way, sometimes to the wet areas and sometimes after it was dry. 
  • In this case, I used the same color of ink the whole time, but I used more ink for a more concentrated color towards the bottom. Feel free mix in some different colors to change it up. Where the colors overlap (or if you let them blend together a bit) you'll have a totally different look. This is all about PLAY. If you don't like it, layer some more color on!
If you'd like to see a super colorful version of this technique, check out my Craft Happy card HERE. 
Sweet and simple handmade card for winter or christmas, using polar bear stamps from FSJ. Called Arctic Wonder, this clear photopolymer stamp set is the highest quality and stamps crisply. Grab it from the FSJ + Spellbinders shop, and visit my blog to see how to create this simple card with a watercolor background. #funstampersjourney #watercolor #handmadecards
As for these bears, you'll find these sweeties in the brand new photopolymer stamp set called Arctic Wonder, from Fun Stampers Journey. (It's part of the holiday collection which releases TODAY!) Once I had that beautiful background all completed and dried, this card came together in a snap. Stamp and die cut the polar bears and sentiment, and this card was basically DONE! (And aren't they SO sweet?) 
Sweet and simple handmade card for winter or christmas, using polar bear stamps from FSJ. Called Arctic Wonder, this clear photopolymer stamp set is the highest quality and stamps crisply. Grab it from the FSJ + Spellbinders shop, and visit my blog to see how to create this simple card with a watercolor background. #funstampersjourney #spellbinders #cardmaking
I hope you enjoyed this card and this fun technique idea! If you try it, I'd love to see what you create! And now, please be sure to stop by the FSJ + Spellbinders shop and see all of our Fall and Winter 2020 collection. You'll find adorable stamps, dies, and more for everything from Halloween to Christmas!
Clean and simple handmade card for winter or christmas, using polar bear stamps from FSJ. Called Arctic Wonder, this clear photopolymer stamp set is the highest quality and stamps crisply. Grab it from the FSJ + Spellbinders shop, and visit my blog to see how to create this simple card with a watercolor background. #funstampersjourney #watercolor #handmadecards
Products Used on Today's Card:
Just like a mermaid, Jane’s 12 dye-based watercolor inks, in easy-to-use water brushes, are highly water-reactive which means you can get all sorts of creative effects effortlessly and every drop of water goes a long way!

Color Splash Sheets watercolor paper sold at Spellbinders

Would you like to see one more sweet card I made with the Arctic Wonder polar bears? This was a fun shaker card with sequins for added sparkle! Image  credit: Spellbinders Paper Arts


Monday, August 3, 2020

Are you CRAFT HAPPY? {Look What's NEW from FSJ!}

Hey there my crafty friends! I have an important question for you: Do you love craft supplies? (Um, DUH) I have a new card for you today and I think you'll love it because it features . .CRAFT SUPPLIES.  Wait, you might be saying, don't all handmade cards feature craft supplies? That's kind of our THING. But this card features craft supply stamps. It's a craft supply made out of craft supplies. (Is your mind blown?) Today's card is filled with fun messy watercolor and some stamps that you're going to LOVE. Ready to check out some CRAFT HAPPY? 

This blog post contains affiliate links. When you shop through my links I receive compensation at no cost to you. Thank you from the bottom of my crafty heart!

Make a handmade card for your crafty friends using the Craft Happy Bundle from FSJ - this clear photopolymer stamp set and coordinating die set is filled with art supplies and crafting supplies that you know and love. Your crafty friends and artist pals will love cards and crafts made with the Craft Happy Stamp and Die set #funstampersjourney #cardmaking #watercolor
This great stamp and coordinating die set is called Craft Happy. These are CLEAR photopolymer stamp sets from Spellbinders + Fun Stampers Journey.  I absolutely LOVE clear stamps, and these are high quality made in the USA stamps, so I'm thrilled that we're adding them to our offerings. If you're a die-hard rubber stamp fan, not to worry - we continue to offer stamps in red rubber, but we're adding in a sprinkling of clear stamps into the mix too. 
The Craft Happy stamps have coordinating dies for EXTRA craft happiness.

And now, let's talk about the colorful background which made my simple black and white stamping really POP. 
Make a handmade card for your crafty friends using the Craft Happy Bundle from FSJ - this clear photopolymer stamp set and coordinating die set is filled with art supplies and crafting supplies that you know and love. Your crafty friends and artist pals will love cards and crafts made with the Craft Happy Stamp and Die set #funstampersjourney #cardmaking #watercolor
I began this background with a sheet of watercolor paper. Using a little water mister, I misted just a bit of water across it to get started. Then I added a blob of water onto the paper, and brushed in Jane Davenport's Mermaid Markers. (Mermaid Markers are filled with highly concentrated watercolor ink with a brush tip.) I dried each splotch of color with a heat tool before creating another one, but sometimes I allowed two to mix a bit. In between, I splattered some Sparkle Silk which mixed in nicely and added some shimmer. I kept layering colors until I was happy with how it looked, and then I let it dry. 

Here's a tip: Soaking and using a heat gun to dry will cause watercolor paper to become warped. When finished with a technique like this, mist the whole sheet again lightly and let it slowly air dry before assembling the card. This helps it to flatten out and removes the warping. 
To finish off the card, I added the stamped and die cut images, added some Rainbow Drops and a bit of glaze and glitter. This watercolor technique was really fun, and because I kept layering the color on, it allowed me to work a little at a time and the colors didn't get out of control or muddy. Definitely a fun way to play!

Thanks so much for stopping by today. I hope you'll go check out the Craft Happy stamps and coordinating dies in the Spellbinders shop, and check out the extra inspiration that's there! xoxo

Supplies on Today's Card:

Want to see more ideas I created with the Craft Happy stamp set?
(photo credits: Spellbinders Paper Arts)
Craft Happy handmade card idea with Spellbinders Craft Happy stamp and die set.

Handmade card featuring the Craft Happy stamp and die set from Spellbinders.
I'm so glad you stopped by today. If this was your first time here, let's connect again!  Subscribe so you don't miss a blog post! You'll also find me on Facebook, Instagramand Pinterest

Saturday, August 10, 2019

Celebrate Fall and Give Thanks With the Holiday Cheer NEW RELEASE from FSJ

Yesterday I shared my new favorite new stamp set from Fun Stampers Journey's Holiday Cheer collection. (If you missed it, I hope you'll click here and see it.) But as usual...today I have another favorite. A girl can have TWO favorites, right? (Or three...or maybe seven?) 

I'm so pleased to introduce Fall Thanks. Seriously - can you EVEN with that sentiment? It is GORGEOUS, people. Want to see the whole sweet stamp set? You'll find it here - and it's available TODAY.  On this card, I embossed the sentiment in copper and it just looks STUNNING with the yellows, browns and aquas. 

This blog post contains affiliate links. If you shop through my links I'll receive compensation at no cost to you. Thank you - for real, from the bottom of my crafty heart!

A Little Bit of How-To: 

To create the background: Brayer Haystack ink onto the Gel Press and splatter some Sparkle Silk. Pull print on Whip Cream cardstock and then splatter Dark Roast Silk.

(I think there were some remnants of another color from a previous project that added a little something extra to this print. I love that!)

A few layers of scraps and some die-cut Branch & Cone images pulled this together - and finished off with Golden Tansy Twine and  Mixed Metallics accents. (That twine is AMAZING. It's stiff so it holds its shape SO well.)

Hopefully by now you have already read yesterday's post, so you've heard me rant, rave, and carry on about the excitement of today's Holiday Cheer Launch Party. But just in case you missed the details, here they are again:


To celebrate the launch of FSJ + Spellbinders new holiday products, we'll be partying LIVE TODAY on the Spellbinders YouTube channel. (The shindig starts at 9am Pacific time). Stop by the Holiday Cheer Landing Page to go directly to the video AND the new products!


You do NOT want to miss this party - all of the new products will be live in the shop, plus there will be specially priced bundles, giveaways, games and antics, demos and tutorials and all the fun you expect from our online launch parties!

Now, would you like to see a totally different look to the Fall Thanks stamp? On this card, I paired the amazing Give Thanks sentiment with a new Cut and Emboss Folder from Spellbinders, called Laurel & Bows. This is the very first time I've used one of the Cut and Emboss Folders, and DANG - it's AMAZING. It embosses AND cuts in one pass through the machine -  the embossing is deep and perfect - and the cut is precise. I'm already a pretty big fan! 
I love that this card doesn't even HAVE to be for fall or winter... this could be a fun thank you card all year long. (Oh, and did I mention that Fall Thanks has a coordinating die!? For the WIN!) 

Alright my crafty peeps - I hope to see you at the FSJ + Spellbinders Holiday Cheer Launch Party TODAY - oh, and hey...just in case you miss it, not to fear - the whole show will be online for you to watch later on! Have a FABULOUS crafty day! xoxo


Project Supplies:


Thursday, June 20, 2019

3 (or more) Fabulous FSJ Stamp Sets You Need to Grab NOW!

Edited 2/18/21- A few products have retired from this list but I've also added a few new bargain basement cuties! Grab them while you can! xoxo

One of my favorite things is to do . . .is to share my favorite things! Today I want to pop by and share a couple of crafty products that I just LOVE, and I don't want you to miss out on. The clearance section at Spellbinders + FSJ is packed with good stuff and some of the items are going to retire when they're sold out - so it's a great time to grab them while you can! 

This post contains affiliate links. If you shop through my links I may receive compensation at no cost to you. Thank you from the bottom of my crafty heart!

Let's take a quick look at some projects I've made with these favy-faves of mine: 

Toucan Do It!

I just love this sweet tropical stamp set called Toucan Do It! Here's a fun layered card I made featuring some watercolor, and Gel Press prints mixed in with patterned paper and cardstock. Even better, you can grab the coordinating dies at a ROCK BOTTOM price. 
(UPDATE: Toucan Do It! is retired now but I love the adorable Toucan Friends chipboard sticker toucans that are equally adorable!)

Best. Dad. Ever

This card features two stamp sets and each of them are an amazing price during the Spellbinders + FSJ Warehouse Sale. Winners is a great realistic stamp set filled with sports equipment and inspiring sentiments - it's great for masculine cards, cards for athletes, and even sports themed treat bags and crafts. Your Day is a great multi-use stamp set (with coordinating dies) for Mother's Day and Father's Day cards and tags.  

Christmas Sprig

Next, the soon-to-retire Christmas Sprig stamp set. (Update - no longer available) . Click on the blog post below to find out just how I created this card, using the Gel Press and a stencil for the background pattern. (It's never too early to start thinking about Christmas cards!) 


Easter Blessings and Hope Anchors

Another holiday favorite - but this time for Easter. Oh friends, I just absolutely LOVE the Easter Blessings and Hope Anchors stamp sets. They are both retiring, and if you don't have these stamps, I highly recommend them if you love to make Easter cards and crafts. (Both of these stamp sets have coordinating dies too: Easter Blessings Dies, and Hope Anchors Dies)  Looking for more floral Easter stamps? Check out Hope Rises too!
Beautiful In It's Time {Easter Blessings Card}

Looking for more inspiration with Easter Blessings and Hope Anchors?
Easy Easter Card Set Tutorial with Easter Blessings and Hope Anchors

Bug Love

The third project I'd love to share with you features the Bug Love stamp set, (UPDATE: no longer available) which has just the CUTEST ladybugs!
Valentine Cards for Guys and Gals

The stamp sets I've shared today are so much fun for holiday cardmaking throughout the year. 

Looking for a few more awesome goodies and an amazing price? A few of my favorite embellishments on sale: 
Silver Sparkle Washi Tape. 
I am in LOVE with the scalloped edge on this glittery washi tape. (AND...the glitter won't rub off all over your hands when you use it. It's perfect in every way!)


Okay friends, I hope you do a little bit of crafty shopping. (Sorry.Not sorry.) 

Tuesday, June 18, 2019

This Is My Favorite Idea for Thank You Cards

In a spirit of gratefulness, I love to say THANK YOU, so thank you cards are always high on my must-make list. I like to keep a stash of them, and I have people who frequently ask me to make them a stash of thank-you's too. 

Using a large sentiment paired with an interesting background is a simple formula for creating a whole stack of thank you cards quickly. Let's take a look at a few ideas, and I'll show you some ideas you can create with YOUR supplies at home!

This blog post contains affiliate links. If you shop through my links I may receive compensation at no cost to you. Thank you from the bottom of my crafty heart!


On this card, I paired a large thanks stamp with a stamped floral background, plus a strip of patterned paper.  You could create this idea using whatever floral stamps you have - even individual flowers that can be stamped together to create a background. The green polka dots give this card a fresh springtime feel, and the strip of black cardstock helps the sentiment POP. 

*Just a note: the stamps I used on this card are no longer available, but I have linked a VERY similar stamp at the end, plus some other ideas that would look awesome too!


If you like to do mixed media, and you have fun trying different techniques with the Gel Press, stencils, paint, and more - then you likely have colorful patterned sheets hanging around your craft room. I had accumulated a good stack of prints, so I cut them into card size pieces and added a stamped sentiment. 

This is one of those glue-and-go projects. I picked coordinating colors of card bases, trimmed down some prints, and then stamped and trimmed the sentiment. Fastest cards ever. And every single one is unique!
Cards like this make a perfect gift set because the sentiment and layout ties them together. The recipient will love looking at all of the creative patterns and colors, and they'll enjoy sending out special thank you cards! 

The print on the card above was created with drops of Re-Inker on the Gel Press. I brayered the colors out just enough to blend them and stretch them a bit, and then I pulled prints. The swirly cards below were created with a shaving cream technique, using FSJ Liquid Colors. 


If you aren't into mixed media, and messy playtime, think about your patterned paper stash! Do you have sheets of paper that are so pretty, they can stand on their own as a card base? Those would be perfect for the background of your thank you cards. 

As for the sentiment - think BIG and bold. Whether you prefer to stamp a sentiment or a die cut one, there are so many to choose from if you don't have something in your stash. Here are a few I love, if you want to do a little shopping:
(check out the samples on the website - they are SOOO cute!)

I'm so glad you stopped by today! 
Let's connect again -subscribe so you don't miss a blog post! xoxo


Monday, March 25, 2019

2 Creative Ways to Use Letter Stickers on Cards and Crafts


Hey friends! It's confession time - tell me...admit it...do you have a drawer of half-used letter stickers of every color, texture, and size stashed in your craft supply? Tell me it isn't just ME.   If you do - you're in luck, because over on the FSJ blog we're sharing two fun ways to use up that stash of letter stickers! I thought I'd pop in here today too, and share a few additional photos of the projects I made for that post, plus I'll add a few more tips, tricks, and ramblings about the cards I created. 


If you're starting here, you may want to stop on over and check out our post at the FSJ blog - (but then don't forget to come back!)


Alright, so here we go. This THANK YOU card was so much fun to make, but it made me a little crazy until I found my way. I learned that imperfections can be totally perfect, and that's the way to go with this technique. I started out by painting the stickers before I attached them to my card - but I found that as I pulled the stickers up and they bent (even just slightly) the paint started to chip and crease. SO, therefore - I WENT WITH IT. And honestly, it was just one of those happy accidents because embracing a distressed look turned out totally awesome for this card! 


Now, onward to this rainbowed beauty! I absolutely LOVE the way this background turned out. Want to try it yourself? Here are the simple steps:
1. Apply lines of Liquid Color onto the Gel Press. I used a rainbow of colors, but you could also use two alternating colors and make a super cool striped background. 
2. Use a brayer to gently roll out the color until its just blended together. 
3. Pull a print on Whip Cream cardstock.
4. Try this process again and again and again because it's beautiful and you'll love it! ;) 


Card Supplies: (Compensated affiliate links used, at no additional cost to you.)

Friday, December 14, 2018

How to Make Fluttering Hearts Mixed Media Cards

Hello friends! I've been playing with two of my favorite crafting tools - the Gel Press and the FSJ Scoring Board, and I'm excited to show you the mini card set and coordinating box I made! This set has four cards, plus a coordinating box that the cards fit into, and both the cards and the box were decorated with Gel Press prints. 

This post contains affiliate links. If you shop from my links, I receive a commission at no cost to you. Thank you from the bottom of my crafty heart!

This project began with two prints using not only the Gel Press, but also the Fluttering Hearts Gel Impressions Plate. The Impressions Plate is just like the Gel Press, but it has a raised heart pattern. You can use it on it's own, or along with the Gel Press. Today I'll show you how! 

The picture below shows the first print that I made. Here's how to create it:

  1. Drop dots of Re-Inker onto the Gel Press to make four lines, one of each color: Limeade Splash, Turbo Teal, Pool Play, Lavender Fusion. Brayer colors to blend and spread.
  2. Splatter Gel Press with Sparkle Silk. (of course!)
  3. Lay Fluttering Hearts Plate facedown onto Gel Press. Gently smooth hand over plate to be sure raised hearts make contact with the press. Carefully lift Fluttering Hearts plate and lay onto Whip Cream cardstock, like a giant stamp. (Or lay cardstock on top of plate and pull a print. Whichever method seems easier to you!)

And that my friends, is your first print. A portion of this print will be adhered to the cover of your box.
Next, we still have that beautiful Gel Press sitting there covered in ink. 
  1. Pull a print from that, and it'll show something similar, but almost opposite of your first print. It'll have that gorgeous blended color background, with just a hint of the heart pattern. 
  2. Trim this print into four 3x3 pieces, and attach them to 4 mini 3.25x3.25" card bases. 
Cute, yes? And remember, you can use ANY four colors you want. Think about how the colors will blend into each other though - choose colors that will blend happily together. (That's why I didn't put green next to purple...it would have turned into mud!)

The box was EASY peasy to make because the FSJ Scoring Board has all the instructions right there on it. Just follow the instructions for the 3.75x3.75 envelope-box and then adhere a piece of that first print you made, right onto the front. So fun!

Looking for more inspiration with the Gel Press or the Scoring Board? Look no further! I got ya!


Supplies Used on Today's Project: