Monday, July 29, 2019

Thankful Grateful Blessed - Acorns for Fall Cards

We've discussed a few times lately my affinity for fall cards. I've mentioned a time or two (or ten) my love of leaf stamps and dies. But I betcha didn't know I love ACORNS too! To be honest, I didn't know I loved acorns so much but THIS STAMP is SO cute. 

(This blog post contains affiliate links. If you purchase through my links I will receive compensation at no cost to you. Thank you from the bottom of my crafty heart! xoxo)

Adorable stamped on different colors. (Aqua acorns anyone???) And adorable watercolored and embossed. Adorable with colored pencils. Adorable anyway you craft this acorn.  

TIP: Repeating a small stamped image as a background is a great way to get more life out of your stamps. To tie this card together, I stamped and trimmed one more acorn to accentuate the sentiment  as the focal point on this card. (And that sentiment - is OH SO CUTE.) 

 Today's post is part of  Old Is New day over on the Impression Obsession blog. It's easy (and fun) to play with the latest and greatest stamps and dies, but we want to find new ways to use the older and well-loved products too. The Old Is New blog hop celebrates the stamps and dies in our stash that have been faithfully loved! 

Thanks so much for stopping by today - and now, head to the Impression Obsession blog to find a link list of the designers participating in Old Is New! I'm sure they have some fabulous oldies-but-goodies to share with you!

Shop the Supplies For Today's Card:


Did you catch last week's post with FALL FABULOUS cards? You'll see the Blessed sentiment stamp in action again, plus some darling stitched leaf dies. 

Sunday, July 28, 2019

Build a Home With Stamps and Dies {Check out this Lil' Inker Designs promotion!}

Hello friends! I just wanted to pop in and share a really fun card + a promotion that you do NOT want to miss at Lil' Inker Designs! These cute-cute-cute stamps and dies will be yours FREE with purchase through July 31st. 

Stop by the Lil' Inker blog to get all the details on this fun deal.  (You can even combo this deal with anything in the clearance section of the website!) 

This post contains affiliate links. When you shop through my links I may receive compensation at no additional cost to you. Thank you from the bottom of my crafty heart!

I had so much fun mixing and matching patterned papers for today's card - I used the Build a Home Stamp and Die Bundle to make this cute scene. There are different windows and doors and accessories to dress up your houses, so there are really SO many possibilities! 
For the sentiment, I used the House & Home Stamp and Die Combo. This one can be yours FREE too!
Making a scene with stamps and dies like this is a great way to use up all the bitty pieces of patterned paper that you love too much to throw out. 

ORGANIZATION IDEA: A few years ago I pulled all of my 6x6 patterned papers out of their packs and reorganized them by color family - this makes it so easy to pick a few different papers that will work well together. Some people like to keep each collection together - but if you find yourself not using your stash of papers as much as you should - consider reorganizing! I took a big leap of faith, but I LOVE it! 

And now, I hope you'll go check out the Lil' Inker blog and website. There's a whole lot of fabulous inspiration, and lots of cute stamps and dies to add to your collection! 


Wednesday, July 24, 2019

Craft Every Week Like It's Shark Week!

Anyone else spend the whole summer waiting for Shark Week on Discovery Channel? My kids have been watching previous year's Shark Week shows online because they just can't wait. We all get into it and I'm sure we'll be watching (and rewatching) every show this year!

(This post contains affiliate links. If you purchase through my links I will receive  compensation at no cost to you. Thank you from the bottom of my shark-loving crafty heart!)

In celebration of our favorite week of summer, I made a few shark-inspired cards that are perfect for Shark Week. 

Product note: the stamp set I used is no longer available, but there are some of THE cutest shark stamps and dies at Simon Says Stamp. Find them all HERE!

The first card is a fun shaker card with three cut-outs. 

Want to try this? 

Die-cut three circles from patterned paper and layer it over a  Clearview Sheet  or acetate panel.  To make it easier, enclose the whole panel with foam tape, rather than making three separate shaker elements. (The sequins will  move freely between the circles by doing it this way.) 
The next card wasn't really planned - but I had those three fun circle cut outs from my first card so I thought - maybe I can do the reverse for another card. This card is sweet and simple. I adhered the three circles onto a white card base, and then added some more die-cut sharks. I trimmed the one shark to look like he's swimming across. 
 Then, after I trimmed off the backside of that shark, I decided that little tail was just the perfect finishing touch on my shaker card, so I added it to the top circle! It was fun to go back and forth working on these cards together.
These shark stamps are so much fun for masculine birthday cards, but I love how the purple and pink colors could make this a perfect card for a girly-girl shark fan too! It's a great stamp set for summer crafting for all occasions. 
Looking for some summer fun craft supplies for Shark Week? 


 Looking for more JAWSOME inspiration with the Shark Attack stamp set? 

Plus, find another MERMAZING shaker card here!

Monday, July 22, 2019

Two Creative Ways to Use Leaf Dies on Fall Cards

Fall cards are my absolute favorite to make. Some people love to make floral cards, and they'll make any kind of card as long as it has flowers . . . well that's how I feel about fall leaves. Give me some cute leaf stamps or dies and I will make cards all. day. long.

{This post contains affiliate links. If you make a purchase through my links, I may receive compensation at no cost to you! Thank you from the bottom of my crafty heart! xoxo}
Today's cards feature a new-to-me favorite leafy set - it's called Patchwork Leaves from Impression Obsession. (It's a stitched die! My favorite!) These cards pretty much include some of my favorite things: leaves, stitched dies, and aqua. 

For this card I die-cut a stash of leaves to create with and I decided to make a wreath shape. This is an easy idea to duplicate with any stamped or die-cut leaves so here's how to make your own:
  • Make a top-folding card base from dark teal cardstock. 
  • Die-cut a large circle from a card-sized panel of white cardstock. Adhere to card base with foam squares. 
  • Stamp and/or die-cut leaves. 
  • Lay them out to cover the circle's edges. The circle creates a guideline for placement to maintain an even shape. 
  • Adhere leaves with glue and foam squares.
  • Add a twine bow and enamel dots.

This next card is about as simple as can be with just two colors of cardstock, some quick die-cutting and a stamped sentiment. I love the way these leaves look as a background. I glued these right down onto my card base, added the sentiment and finished it off with some sequins. (This would be a great card to mass-produce for thank you cards or a gift set.)


Shop the Supplies on Today's Cards:

Are you like me, and you're dying to get started on leafy fall cards? Here are some more projects you might love:

Monday, July 15, 2019

Make This Simple Faux Chalkboard for Handmade Cards

Who was your favorite teacher? I bet you have one - and if you're lucky you have two or three or ten! I have a handful of my own favorite teachers, plus as a mom I also have a handful of my children's favorite teachers - and I LOVE to shower them with handmade cards. Today's card will be darling to say, "Welcome back to school!" And the In The Classroom stamp set from Impression Obsession will be perfect for back to school scrapbook pages too!

(This post contains affiliate links. If you shop through my links, I may receive a compensation at no cost to you. Thank you from the bottom of my crafty heart!)
 I love how this little faux chalkboard turned out and it is SO easy to make. Trim a block of black cardstock for the chalkboard. Heat embossing white onto black cardstock instantly gives a chalkboard feel. Then mat the chalkboard on kraft or brown cardstock. (I embossed the kraft with a woodgrain embossing folder for a little added texture.) Trim a thin strip to add along the bottom for the chalk ledge.

TIP: To make your chalkboard look extra chalky, you can rub it with white chalk (duh) or PanPastel, or add a little white colored pencil. I left this one pretty crisp and "clean" because I liked the contrast. Try it both ways and see what you like! Check out another chalkboard I created here. 

To finish this card, I colored the stamped images with colored pencil, trimmed them and then assembled a little classroom scene. I like the way the blue strip grounds the scene and finishes off the classroom feel.
Today's post is part of  Old Is New day over on the Impression Obsession blog. It's easy (and fun) add the latest and greatest stamps and dies, but we want to find new ways to use the older and well-loved products too. The Old Is New blog hop celebrates the stamps and dies in our stash that have been faithfully loved! 

Thanks so much for stopping by today - and now, head to the Impression Obsession blog to find a link list of the designers participating in Old Is New! I'm sure they have some fabulous oldies-but-goodies to share with you!

Impression Obsession Supplies: In the Classroom Clear Stamp Set


If you loved this card, you might love these too!


Let's connect again soon! Follow me on Facebook, Instagram, and Pinterest where I'm sharing crafty goodness every day of the week! Don't want to miss a blog post? Click subscribe up in the sidebar!

PS. Do you LOVE that buffalo check planner I used in some of my photos? It is on clearance for SUCH an amazing deal. If you're looking for a planner, this one is OH SO CUTE.

Thursday, July 11, 2019

Make a Mermaid Shaker Card with Spellbinders + FSJ

The Shellebrate Card Kit from Spellbinders and the FSJ Age of Aquarium Stamp Set are a pretty awesome matchup together for summertime cards and crafting. I had fun mixing and matching stamps, dies, and accessories from the two monthly clubs and you NEED to see this SUPER FUN shaker card. 

FSJ released a really neat die set along with the Stamp of the Month  set for July. It's called the Aquarium Box Die and it makes a sweet little box, about the size of a gift card. You can die-cut out the center and add a sheet of acetate and then build a fun underwater scene. Everything I used to create my scene and card are from the Spellbinders Shellebrate Card Kit - except the Splash Zone sequins from FSJ. (Because, HELLO. They are so beyond perfect with it!) 

Even the silver cardstock was part of the Shellebrate kit, and it works SO well with the aquarium die. It's a little thicker than other cardstock I have and it really holds the shape nicely for the aquarium. I absolutely loved putting together this little scene! Below are a few more cards that I made with the Shellebrate Card Kit. (If you caught yesterday's post, you saw a few of these already! If not, find that post HERE.)

And before I go, just one more card that I made with this kit. That flamingo, y'all. Isn't it sweet? I love it paired with the diagonal striped paper. For this card, I used a sentiment from FSJ, from the Letterboard Sentiments stamp set. Super simple and fun for summer celebrations.
 If you haven't taken a look at the Spellbinders Card Kit of the Month, you can find all the details about this awesome kit. It is SERIOUSLY packed with goodies.

Looking for just a few of the items in this kit? Grab them in the Card Club Kit Extras:
Shellebrate stamp set
paper packstickers
die cut shapes

Tuesday, July 9, 2019

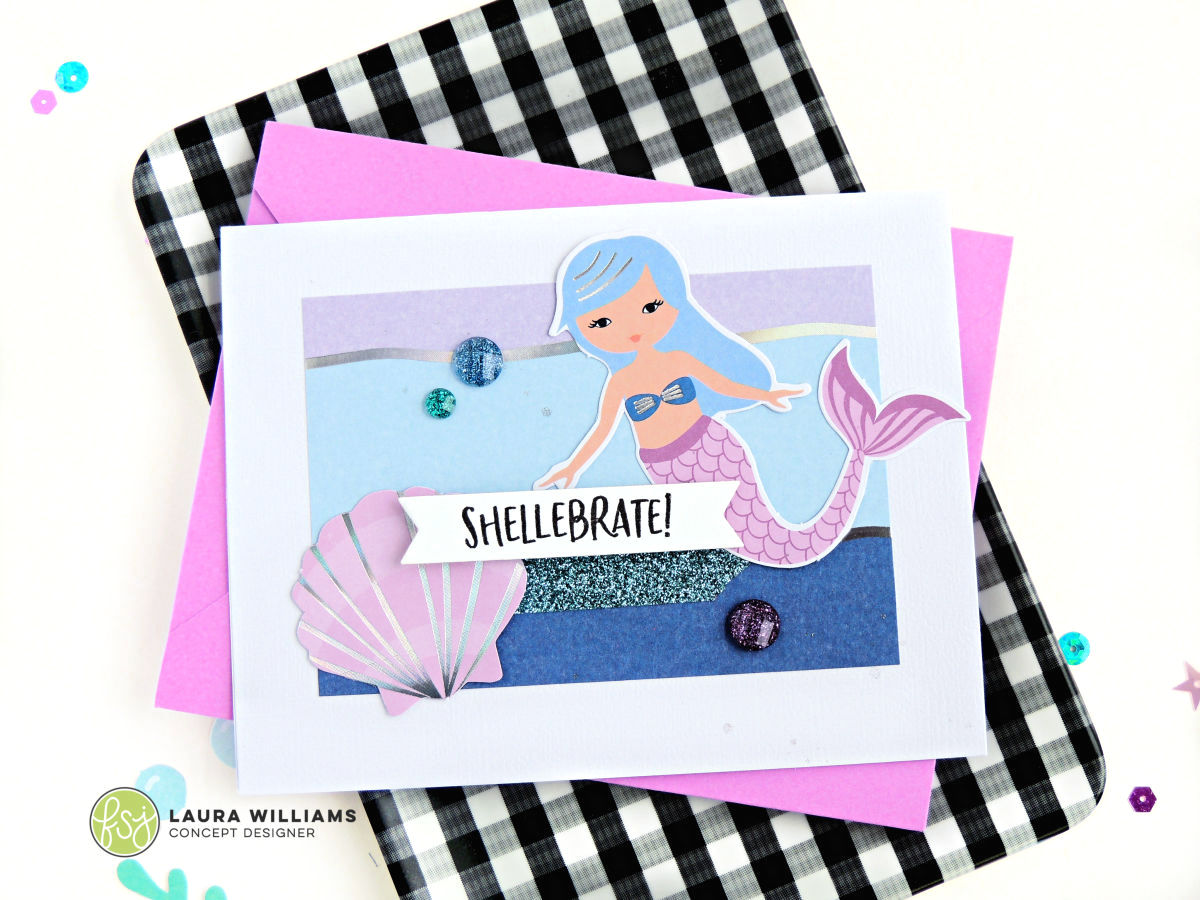
Meet Spellbinders July Card Kit of the Month - Shellebrate!

There's just something magical about mermaids and bubbles and seashells in the summertime, isn't there? They're such fun all year long, but summertime is MADE for this. The Spellbinders Card Kit of the Month for July is called Shellebrate, and it is packed with all you need to create dreamy, underwater scenes with mermaids, swaying underwater grasses, adorable sea creatures, and seashells. 
You guys, these card kits are absolutely PACKED with goodness. The kit information says that you can create 10 cards because the kit includes 10 card bases with envelopes. But I'm here to tell you that I've created 7 cards so far, and I haven't even made a DENT in the supplies. Seriously. Mermaid.Cards.For.Days. (Yay!!!) 

With so much goodness in this kit, I decided to knock out some birthday cards that someone asked me to make. I followed the same basic card layout for the cards below, but mixed and matched the papers and accessories in the kit. The only thing I added to these cards is a little Sparkle Washi Tape and sequins. It's a simple layout, allowing the fun die cut shapes and patterned papers to shine!

 The card below is the same layout, just turned horizontally. TIP - Bring new life out of a favorite card sketch or layout idea by turning it sideways or upside down! 

I made 6 Shellebrate cards and it was so much fun to mix and match the shells and mermaids. The card kit comes with foam stickers, die cut shapes and self-adhesive sparkly gems that are so gorgeous. Would you like a peek at ALL the goodness in this kit? It even includes an awesome mermaid die set plus a clear stamp set.

This blog post contains affiliate links. When you purchase through my links, I may receive compensation at no additional cost to you. Thank you from the bottom of my crafty heart!
Do you love this kit, but you don't want quite everything? Or maybe you love it so much you need a few extras? Check out the Monthly Card Kit Extras, where you can snag just the Shellebrate stamp set, the 6x6 paper pack, stickers, or die cut shapes individually.

Interested in the whole thing? Find all the details on the Spellbinders Card Kit of the Month where you'll find all the info and more inspiration using this MERMAZING card kit! ;)

Tomorrow I'll be back with more projects using the Shellebrate Card Kit of the Month - I did some mixing and matching with the FSJ Stamp of the Month and coordinating die set. These two go hand in hand . . .or should I say FIN in FIN? They complement each other so well, and I can't wait to show you - stop by tomorrow and hang with me again! xoxo


Monday, July 8, 2019

Fruity Fresh Summer Cards with Die-Cutting {Impression Obsession}

The Impression Obsession Summer Die Release Celebration starts today! We're celebrating on July 8th & 9th with die-cut cards and crafts featuring brand new dies that you are going to LOVE.

This post contains affiliate links. When you shop through my links, I may receive a small compensation at no additional cost to you. Thank you from the bottom of my crafty heart!


Today I'm featuring a couple of new die sets - and a few are basics that you'll be adding to ALL of your projects. Look at the Scalloped Stitched Circles Dies and Stitched Pinked Circles Dies. The stitched details are just fabulous! I had fun mixing and layering the pinked and scalloped circles for this first card.
To make both of today's cards, I mixed dies from the Jam Jar Fruits along with the Flower Cart Flowers.  All of these little dies are so cute to mix and match along with other dies, or on their own. 
This card features the same dies but mixed and matched in a different way! How SWEET is that bee hive?
I'm so glad you stopped by to celebrate the Summer Die Release at Impression Obsession. You can find a list of all the designers participating in the blog hop on the Impression Obsession BlogFour lucky winners who comment along the way will win $25 gift certificates - so comment on all of the blogs for the best chance to win! All comments will be open until Sunday July 14th at noon CT. Winners will be announced on Tuesday July 16th.

You can find all of the dies being released, along with our latest stamps in the New Products section of the Impression Obsession website.  Thanks again for visiting - don't forget to stop back tomorrow for another die-cutting project!


Wednesday, July 3, 2019

Say Merry Christmas With the Cutest Santa Stamp!

Looking for the cutest Santa Claus stamp for your handmade Christmas cards and crafts? I'd like to introduce you to Nicholas. Everyone, this is Nicholas. Nicholas, this is everyone...

Isn't he absolutely adorable, with his polka-dotted Santa hat? And his curly mustache? And his striped tights? Cutie.Patootie. Paired with this Merry Christmas sentiment and that amazing Snowfall background die, I am just in love with the whimsical, festive look of these Christmas goodies from Impression Obsession. 
This post is part of the Impression Obsession's latest stamp release party. Whether you love festive and whimsical, or traditional and elegant, clean and simple or layers of goodness - you'll find something you LOVE in this release of stamps. This release includes back-to-school, fall and Halloween, winter and Christmas, plus a ton of great sentiments and images you can use all year long.

And now, don't miss a single stop on the Impression Obsession blog hop - you'll find a list of participants each day on the Impression Obsession Blog at 6am.  
Every blog will have a $25 gift certificate to give away for the event - so the more you comment through our Release Celebration the more chances to win! All comments for all of the event days will be open until Sunday July 7th at noon CT. All winner will be announced on Tuesday July 9th.
This post contains affiliate links. When you shop through my links, I may receive a compensation at no cost to you. Thank you from the bottom of my crafty heart!

Impression Obsession Card Supplies: 


 (Find all the new stamps in the release: here in the IO Shop!)

Other supplies: Good Vibes Prints paper | FSJ cardstock | Color Burst Pure Color Pencils 

Let's connect again soon! Follow me on Facebook, Instagram, and Pinterest where I'm sharing crafty goodness every day of the week! Don't want to miss a blog post? Click subscribe up in the sidebar!

Tuesday, July 2, 2019

Pumpkin Kisses and Harvest Wishes on a Bold Autumn Card

Hey there my crafty friends! 
I know you're thinking about sparklers and sunscreen this week. . .
but can we talk about pumpkins? 
(It's never ever too soon to talk about pumpkins.) 

I'm talking about pumpkins today because it's Day 2 of the Fall/Winter Stamp Release at Impression Obsession. And the darling Pumpkin Kisses clear stamp set is part of the new goodies in the shop! Can you even STAND the cuteness of that little row of pumpkins? I colored all of these images with colored pencils, and paired it with a die-cut tag and bold black and white patterned paper. 

(This post contains affiliate links. If you shop through my links, I may receive a compensation at no cost to you - thank you from the bottom of my crafty heart!) 

This stamp set is going to be absolutely adorable for all types of fall cards and crafts, and I know you're going to LOVE it. So see - wasn't it worth taking a break from sparklers, sunshine, and sunscreen . . .to think about pumpkins!? 


And now for some important details about this blog hop:
Each day (July 1st - July 3rd ) head to the Impression Obsession Blog at for a list of the designers who are sharing crafty goodness! Every single blog will have a $25 gift certificate to give away for the event - so the more you comment through our Release Celebration the more chances to win! All comments for all of the event days will be open until Sunday July 7th at noon CT. All winners will be announced on Tuesday July 9th.

All of the new stamps from the Fall/Winter Release are available now! You can find them all HERE! Be sure to check them all out - it's never too early for pumpkin stamps . . . or Christmas stamps!

Impression Obsession Card Supplies: Pumpkin Kisses Clear Stamp Set | Stitched Tag Dies

Other Supplies: FSJ - Silver Sparkle Tape | Colorful Journey Prints 12x12 paper |